微信公众号爬虫v1.2实现了订阅号的抓取,但是没有实现服务号的抓取,原因是服务号的页面无法通过pywinauto得到页面的信息,从而无法模拟人的操作点击文章。本文通过视觉的页面分析,让爬虫模拟人类分析出文章的位置,从而实现服务号抓取。
目录
问题描述
订阅号与服务号的区别
微信公众号分为订阅号与服务号,根据申请的主题不同又分为普通订阅号、普通服务号、认证订阅号和认证服务号。认证的订阅号/服务号权限更大,但是对于爬虫来说我们只需要分为订阅号和服务号就行。订阅号和服务号的详细区别请参考微信公众号:订阅号与服务号的区别对比。不过从爬虫的角度来说,它们最主要的区别如下在于其消息展示方式不同,从而页面不同。
 订阅号
订阅号
 服务号
服务号
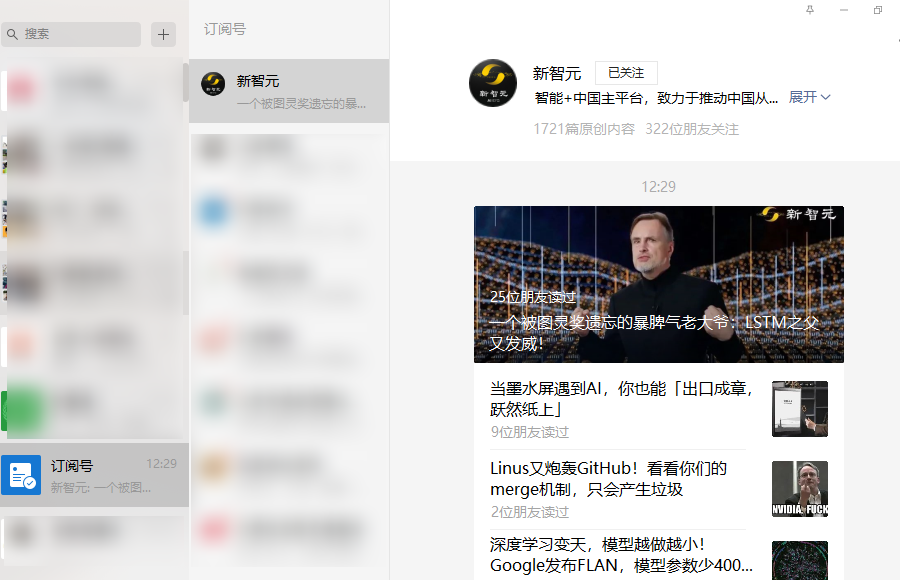
我们可以看到,所有的订阅号会集合在一起展示。比如”新智元”这个订阅号,展示分为三个区域:”订阅号”->”新智元”->列表页。点击列表页中的一篇文章会弹出一个浏览器窗口,这是我们之前的抓取方式:不断用PageDown翻页,点击打开浏览器,抓取,关闭浏览器……。
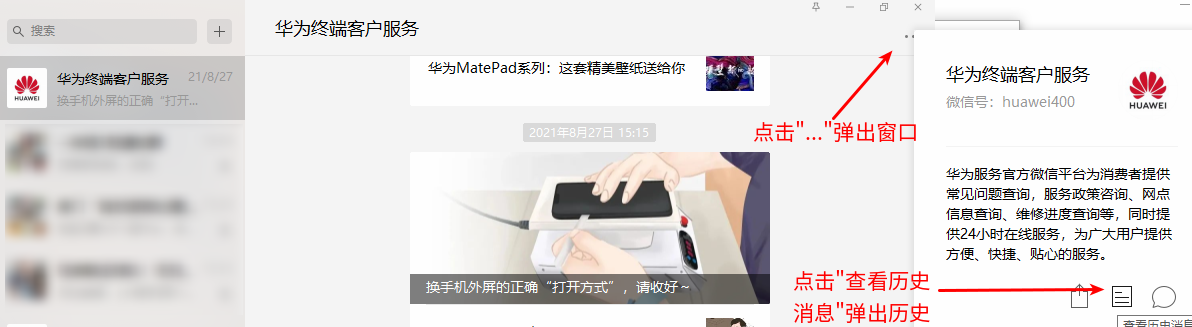
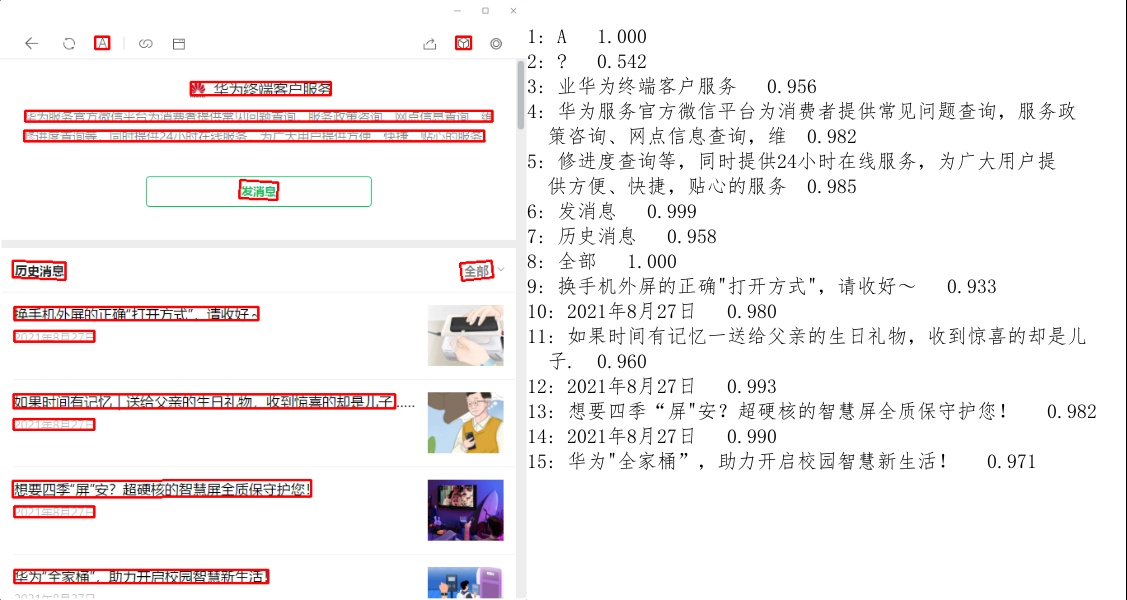
而服务号是单独展示的,要查看历史消息,我们需要点击右上角的”…“按钮,从而弹出列表页。而且点击这个列表页的文章时不会弹出新的窗口,而是在当前窗口打开,因此返回列表页不能关闭窗口,而是要点击后退按钮,如下图所示:
 服务号文章是在列表页直接打开
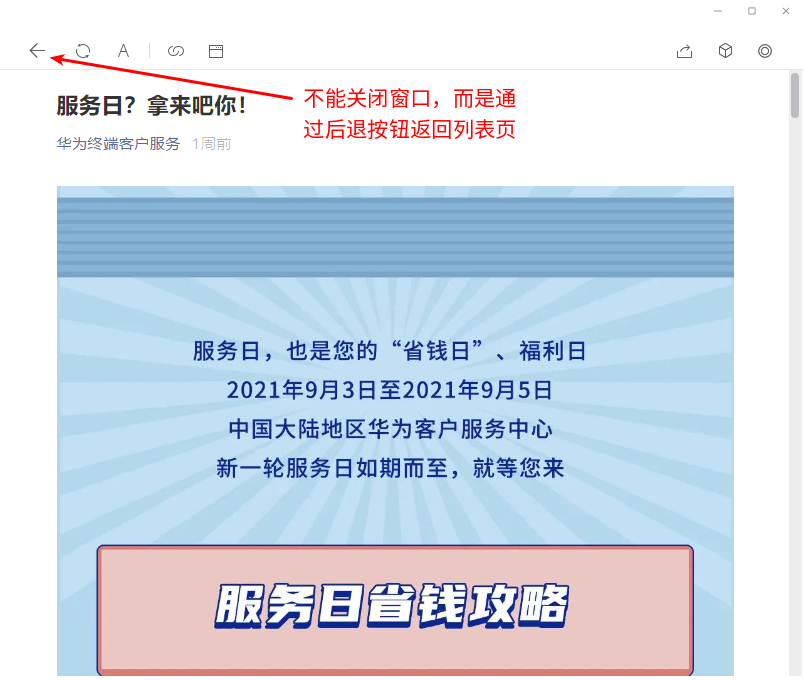 通过后退按钮返回列表页
服务号列表页分析
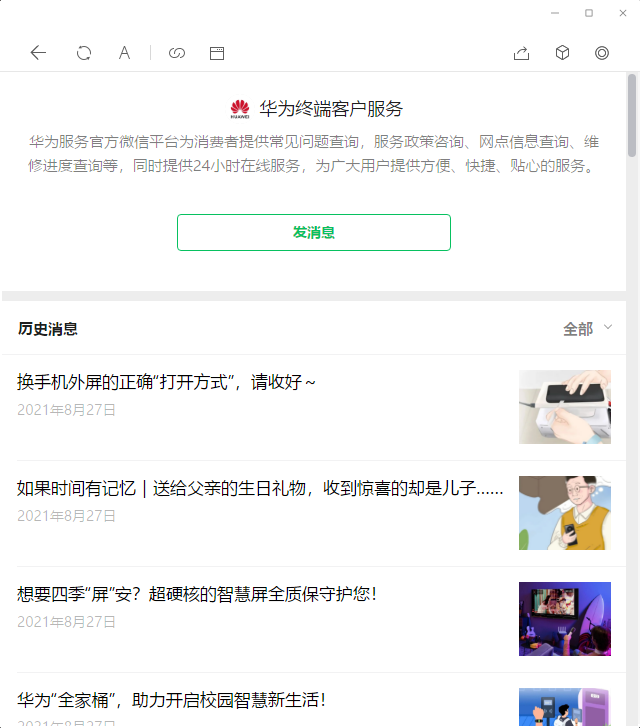
我们前面抓取订阅号时,可以直接通过pywinauto得到列表页中每篇文章的block的坐标信息,从而可以控制爬虫模拟进行点击。但是对于服务号,没有办法得到正确的坐标信息。我不知道是什么原因,开了个issue也没解决。当然,对于人类来说,我们并不需要知道这些metadata,而是通过视觉的分析判断某一块区域就是一篇文章,从而点击这篇文章。而我们这篇文章主要解决的问题,也就是对服务号内容列表页进行页面分析,定位每篇文章。
尝试过的方法
下面是待分析的服务号列表页内容:
页面布局分析
从问题来说,这是一个页面布局分析问题。因为最近看到一篇论文和它开源的代码,于是拿来试试。论文题为LayoutParser: A Unified Toolkit for DeepLearning Based Document Image Analysis,简单的试了一下,效果并不理想:
import layoutparser as lp
import cv2

#image = cv2.imread("a.png")
image = cv2.imread("paper.png")
image = image[..., ::-1]

model = lp.Detectron2LayoutModel('lp://PubLayNet/faster_rcnn_R_50_FPN_3x/config',
                                 extra_config=["MODEL.ROI_HEADS.SCORE_THRESH_TEST", 0.8],
                                 label_map={0: "Text", 1: "Title", 2: "List", 3:"Table", 4:"Figure"})

layout = model.detect(image)

lp.draw_box(image, layout, box_width=3)

cv2.imwrite("lp.png", image)
PubLayNet模型应该只是用论文的数据训练的,因此效果不好,完全没有分析出来。
tesseract引擎
ocr一般分为detection和recognition两个步骤。我们前面使用tesseract来抽取阅读数时使用的单行模式,跳过了检测步骤,我们也可以让tesseract来做检测然后识别:
from pytesseract import Output
import pytesseract
import argparse
import cv2

ap = argparse.ArgumentParser()

ap.add_argument("-i", "--image", required=True,
        help="path to input image to be OCR'd")
ap.add_argument("-c", "--min-conf", type=int, default=0,
        help="mininum confidence value to filter weak text detection")
args = vars(ap.parse_args())

options = "-l {} --psm {}".format("chi_sim", "3")
image = cv2.imread(args["image"])
rgb = cv2.cvtColor(image, cv2.COLOR_BGR2RGB)
results = pytesseract.image_to_data(rgb,
                                output_type=Output.DICT,
                                    config=options)

for i in range(0, len(results["text"])):
    # extract the bounding box coordinates of the text region from
    # the current result
    x = results["left"][i]
    y = results["top"][i]
    w = results["width"][i]
    h = results["height"][i]
    text = results["text"][i]
    conf = int(results["conf"][i])
    cv2.rectangle(image, (x, y), (x+w, y+h), (0, 255, 0), 2)

cv2.imwrite("tess.png", image)
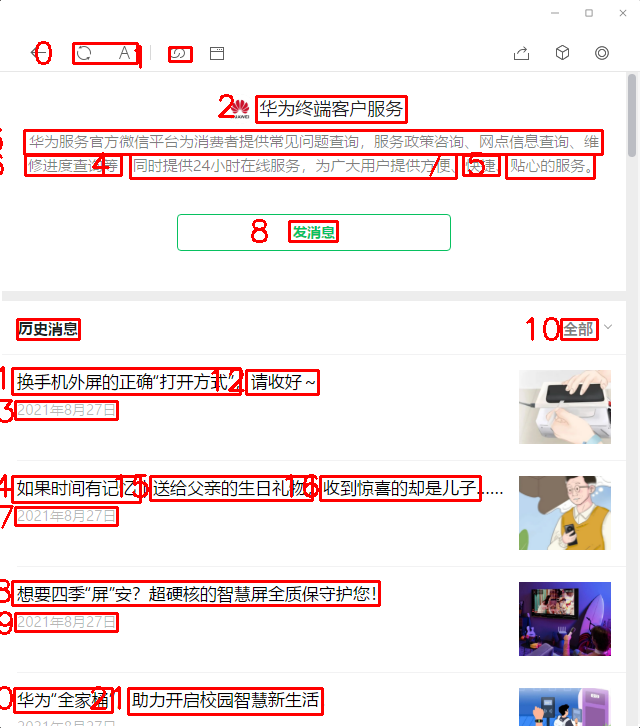
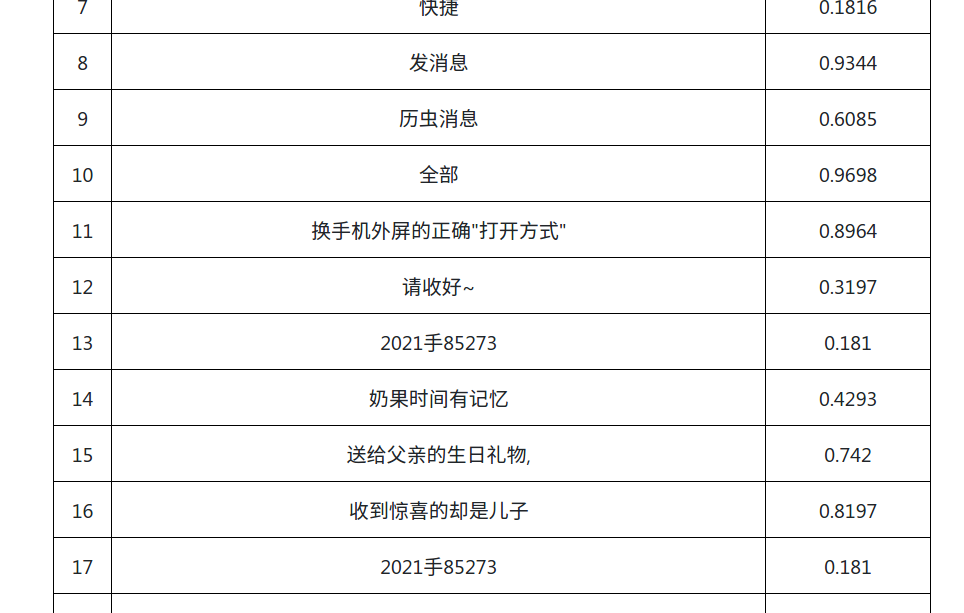
调用pytesseract.image_to_data方法可以得到除了文本的其它信息:boundingbox(left,top,width,height)还有置信度得分。结果如下图:
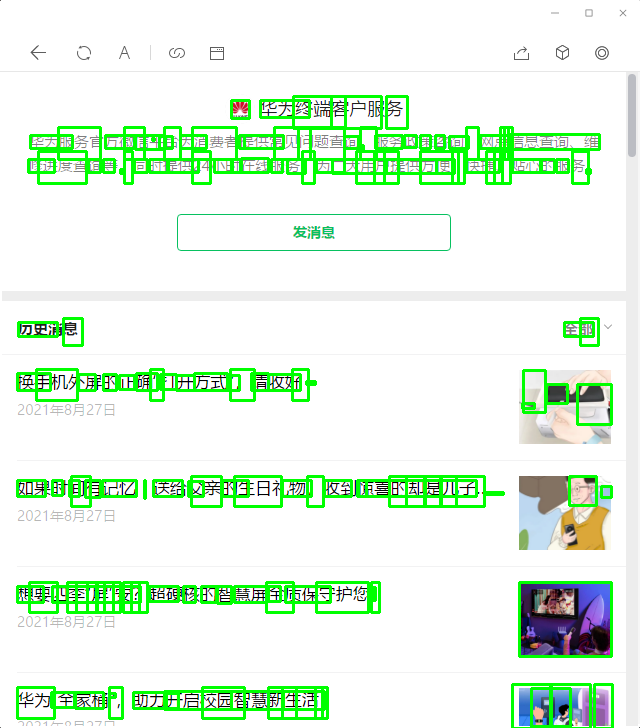 tessearct的分析结果
可以发现效果很不好,首先日期没有被检测出来(这是我们后面定位的关键稳定特征);而且汉字块都不连续。个人猜测tesseract虽然识别有中文的模型(效果也一般),但是检测可能还是英文的数据,所以效果不好。
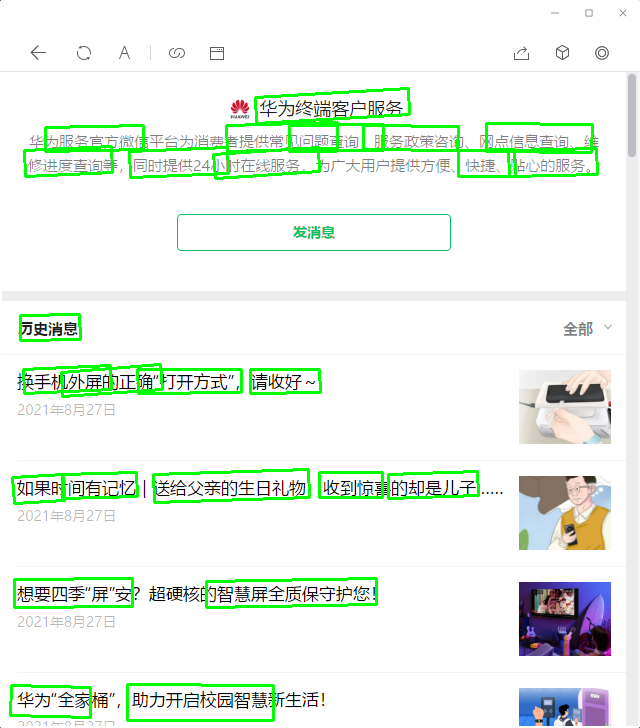
EasyOCR
EasyOCR是一个非常流行的OCR工具,支持多种语言,而且还有一个Web的Demo,因此我也尝试了一下,结果如下:
 EasyOCR检测结果
 EasyOCR识别结果
可以看到EasyOCR的检测结果还行,识别也勉强,但是识别日期问题很大,”x年x月x日”基本都识别错了,我猜测是语言模型的问题。
East算法
EAST: An Efficient and Accurate Scene Text Detector是OpenCV提供的场景文字检测模型,不了解的读者可以阅读论文或者参考OpenCV Text Detection (EAST text detector)或者Deep Learning based Text Detection Using OpenCV (C++/Python)。代码参考的是第一篇文章。首先是east.py:
import numpy as np

EAST_OUTPUT_LAYERS = [
    "feature_fusion/Conv_7/Sigmoid",
    "feature_fusion/concat_3"]
def decode_predictions(scores, geometry, minConf=0.5):
    # grab the number of rows and columns from the scores volume, then
    # initialize our set of bounding box rectangles and corresponding
    # confidence scores
    (numRows, numCols) = scores.shape[2:4]
    rects = []
    confidences = []

    # loop over the number of rows
    for y in range(0, numRows):
        # extract the scores (probabilities), followed by the
        # geometrical data used to derive potential bounding box
        # coordinates that surround text
        scoresData = scores[0, 0, y]
        xData0 = geometry[0, 0, y]
        xData1 = geometry[0, 1, y]
        xData2 = geometry[0, 2, y]
        xData3 = geometry[0, 3, y]
        anglesData = geometry[0, 4, y]

        # loop over the number of columns
        for x in range(0, numCols):
            # grab the confidence score for the current detection
            score = float(scoresData[x])
            # if our score does not have sufficient probability,
            # ignore it
            if score < minConf:
                continue
            # compute the offset factor as our resulting feature
            # maps will be 4x smaller than the input image
            (offsetX, offsetY) = (x * 4.0, y * 4.0)

            # extract the rotation angle for the prediction and
            # then compute the sin and cosine
            angle = anglesData[x]
            cos = np.cos(angle)
            sin = np.sin(angle)

            h = xData0[x] + xData2[x]
            w = xData1[x] + xData3[x]

            offset = ([
                offsetX + (cos * xData1[x]) + (sin * xData2[x]),
                offsetY - (sin * xData1[x]) + (cos * xData2[x])])

            # derive the top-right corner and bottom-right corner of
            # the rotated bounding box
            topLeft = ((-sin * h) + offset[0], (-cos * h) + offset[1])
            topRight = ((-cos * w) + offset[0], (sin * w) + offset[1])

            # compute the center (x, y)-coordinates of the rotated
            # bounding box
            cX = 0.5 * (topLeft[0] + topRight[0])
            cY = 0.5 * (topLeft[1] + topRight[1])

            # our rotated bounding box information consists of the
            # center (x, y)-coordinates of the box, the width and
            # height of the box, as well as the rotation angle
            box = ((cX, cY), (w, h), -1 * angle * 180.0 / np.pi)

            # update our detections and confidences lists
            rects.append(box)
            confidences.append(score)

    return (rects, confidences)
然后是测试代码localize_text_opencv.py:
# import the necessary packages
from east import EAST_OUTPUT_LAYERS
from east import decode_predictions
import numpy as np
import argparse
import time
import cv2

ap = argparse.ArgumentParser()
ap.add_argument("-i", "--image", required=True,
    help="path to input image")
ap.add_argument("-e", "--east", required=True,
    help="path to input EAST text detector")
ap.add_argument("-w", "--width", type=int, default=320,
    help="resized image width (should be multiple of 32)")
ap.add_argument("-t", "--height", type=int, default=320,
    help="resized image height (should be multiple of 32)")
ap.add_argument("-c", "--min-conf", type=float, default=0.5,
    help="minimum probability required to inspect a text region")
ap.add_argument("-n", "--nms-thresh", type=float, default=0.4,
    help="non-maximum suppression threshold")
args = vars(ap.parse_args())

image = cv2.imread(args["image"])
(origH, origW) = image.shape[:2]

# set the new width and height and then determine the ratio in change
# for both the width and height
(newW, newH) = (args["width"], args["height"])
rW = origW / float(newW)
rH = origH / float(newH)

print("[INFO] loading EAST text detector...")
net = cv2.dnn.readNet(args["east"])

blob = cv2.dnn.blobFromImage(image, 1.0, (newW, newH),
        (123.68, 116.78, 103.94), swapRB=True, crop=False)
start = time.time()
net.setInput(blob)
(scores, geometry) = net.forward(EAST_OUTPUT_LAYERS)
end = time.time()

print("[INFO] text detection took {:.6f} seconds".format(end - start))

# decode the predictions form OpenCV's EAST text detector and then
# apply non-maximum suppression (NMS) to the rotated bounding boxes
(rects, confidences) = decode_predictions(scores, geometry,
    minConf=args["min_conf"])
idxs = cv2.dnn.NMSBoxesRotated(rects, confidences,
        args["min_conf"], args["nms_thresh"])

# ensure that at least one text bounding box was found
if len(idxs) > 0:
    # loop over the valid bounding box indexes after applying NMS
    for i in idxs.flatten():
        # compute the four corners of the bounding box, scale the
        # coordinates based on the respective ratios, and then
        # convert the box to an integer NumPy array
        box = cv2.boxPoints(rects[i])
        box[:, 0] *= rW
        box[:, 1] *= rH
        box = np.int0(box)
        cv2.polylines(image, [box], True, (0, 255, 0), 2)

cv2.imwrite("east.png", image)
模型可以去这里下载,然后运行:
python localize_text_opencv.py -i a.png -e frozen_east_text_detection.pb
结果如下:
 EAST算法的检测结果
日期依然没有检测出来!
PaddleOCR
这里参考了PaddleHub一键OCR中文识别(超轻量8.1M模型,火爆)(2020/09/21更新版),代码如下:
import matplotlib.pyplot as plt
import matplotlib.image as mpimg

# 待预测图片
test_img_path = ["./example.jpg"]

# 展示其中广告信息图片
img1 = mpimg.imread(test_img_path[0])
plt.figure(figsize=(10,10))
plt.imshow(img1)
plt.axis('off')
plt.show()

import paddlehub as hub

#ocr = hub.Module(name="chinese_ocr_db_crnn_mobile")
ocr = hub.Module(name="chinese_ocr_db_crnn_server")

import cv2

# 读取测试文件夹test.txt中的照片路径
np_images =[cv2.imread(image_path) for image_path in test_img_path]

results = ocr.recognize_text(
                    images=np_images,         # 图片数据,ndarray.shape 为 [H, W, C],BGR格式;
                    use_gpu=True,            # 是否使用 GPU;若使用GPU,请先设置CUDA_VISIBLE_DEVICES环境变量
                    output_dir='ocr_result',  # 图片的保存路径,默认设为 ocr_result;
                    visualization=True,       # 是否将识别结果保存为图片文件;
                    box_thresh=0.5,           # 检测文本框置信度的阈值;
                    text_thresh=0.5)          # 识别中文文本置信度的阈值;

for result in results:
    data = result['data']
    save_path = result['save_path']
    for infomation in data:
        print('text: ', infomation['text'], '\nconfidence: ', infomation['confidence'], '\ntext_box_position: ', infomation['text_box_position'])
效果如下:
 PaddleOCR的结果
可以发现它的效果非常好,检测和识别都非常准确。
实际解决方法
从上面的调研来看,使用PaddleOCR应该可以满足我们的需求,但是要使用PaddleOCR需要安装PaddlePaddle框架,而且也需要一定的计算资源。对于上面的问题,我们其实注意能够定位到“X年X月X日”就可以了,因此我最终使用的是OpenCV里非常简单的图像处理技巧来定位,然后用tesseract来识别日期(因为我们已经引入了tesseract,如果之前没有一个ocr引擎,也许可以考虑PaddleOCR,不过我们只是用ocr识别数字和日期,因此tesseract也勉强够用了)。
检测
检测的代码如下:
# Import required packages
import cv2
import pytesseract

# Read image from which text needs to be extracted
img = cv2.imread("a.png")

# Preprocessing the image starts

# Convert the image to gray scale
gray = cv2.cvtColor(img, cv2.COLOR_BGR2GRAY)

# Performing OTSU threshold
ret, thresh1 = cv2.threshold(gray, 200, 255, cv2.THRESH_BINARY_INV)

# Specify structure shape and kernel size.
# Kernel size increases or decreases the area
# of the rectangle to be detected.
# A smaller value like (10, 10) will detect
# each word instead of a sentence.
rect_kernel = cv2.getStructuringElement(cv2.MORPH_RECT, (12, 12))

# Appplying dilation on the threshold image
dilation = cv2.dilate(thresh1, rect_kernel, iterations=1)

# Finding contours
contours, hierarchy = cv2.findContours(dilation, cv2.RETR_EXTERNAL,
                                       cv2.CHAIN_APPROX_NONE)

# Creating a copy of image
im2 = img.copy()


# Looping through the identified contours
# Then rectangular part is cropped and passed on
# to pytesseract for extracting text from it
# Extracted text is then written into the text file
for cnt in contours:
    x, y, w, h = cv2.boundingRect(cnt)

    # Drawing a rectangle on copied image
    rect = cv2.rectangle(im2, (x, y), (x + w, y + h), (0, 255, 0), 2)


cv2.imshow("Text Detection", im2)
cv2.waitKey(0)
最终检测的结果如下图所示:
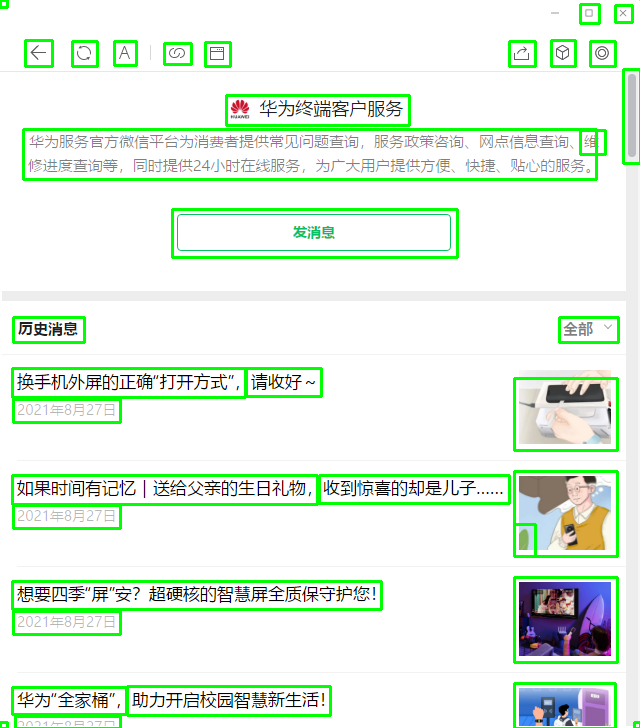 检测结果
检测结果
识别
检测到了之后我们可以遍历所有的文本框,使用tesseract识别出日期。
def locate_articles(pil_img_array, kernel=12, thrshold=200, x_max=50):
    img = cv2.cvtColor(pil_img_array, cv2.COLOR_RGB2BGR)
    gray = cv2.cvtColor(img, cv2.COLOR_BGR2GRAY)
    ret, thresh1 = cv2.threshold(gray, thrshold, 255, cv2.THRESH_BINARY_INV)
    rect_kernel = cv2.getStructuringElement(cv2.MORPH_RECT, (kernel, kernel))

    # Appplying dilation on the threshold image
    dilation = cv2.dilate(thresh1, rect_kernel, iterations=1)

    # Finding contours
    contours, hierarchy = cv2.findContours(dilation, cv2.RETR_EXTERNAL,
                                           cv2.CHAIN_APPROX_NONE)

    contours = sort_contours(contours, method="top-to-bottom")[0]
    date_list = []
    for cnt in contours:
        x, y, w, h = cv2.boundingRect(cnt)
        if x < x_max and w > 20:
            region = Image.fromarray(pil_img_array[y:y+h, x:x+w])
            text = _clear_text(ocr(region))
            if not _is_date(text):
                continue
            date_list.append((x, y, w, h))


    return date_list
我们通过imutils.sort_contours对文本框从上到下排序,而且根据先验知识,我们知道日期块的比较靠左边,所以可以进行一下过滤,然后用tesseract进行ocr,通过正则表达式判断是否日期。imutils需要使用pip install imutils安装。
- 显示Disqus评论(需要科学上网)