本文介绍Pytorch源代码编译的方法,并且介绍使用vscode同时调试pytorch python和c++代码的方法。
目录
编译
编译的过程主要参考了官方文档。
预备条件
从源代码编译Pytorch需要:
- python 3.8或最新版本(Linux需要3.8.1)
- 支持C++17的编译器,比如clang或者gcc 9.4.0之后的版本
本文介绍在Linux(Ubuntu 18.04 和Ubuntu 20.04测试过)上的编译,如果是其它系统请参考官方文档。
我使用的是Python 3.9,如果您系统的包管理器无法提供3.8.1之后的Python,可以参考Ubuntu18.04从源代码安装Python3.9自行编译安装。
如果您系统的gcc版本过低,请参考Is there a PPA that always has the latest gcc version (including g++)?,为了方便,请参考Update GCC on Ubuntu设置gcc的环境(避免编译使用老的gcc)。
根据官方文档,我会使用miniconda来创建虚拟环境,请参考Installing Miniconda安装。
我编译的pytorch基于CUDA 12.1,请参考官方文档下载安装。CUDNN 8.6,请参考官方文档下载安装。同时使用CUDA 12.1自带的nvcc编译器:
$ nvcc --version
nvcc: NVIDIA (R) Cuda compiler driver
Copyright (c) 2005-2023 NVIDIA Corporation
Built on Mon_Apr__3_17:16:06_PDT_2023
Cuda compilation tools, release 12.1, V12.1.105
Build cuda_12.1.r12.1/compiler.32688072_0
在Ubuntu 18.04上安装的CUDA Driver是535.104.12,Ubuntu 20.04上使用的是545.29.06。关于CUDA Toolkit和Driver的兼容性请参考NVIDIA CUDA Toolkit Release Notes,因为后面需要magma-cuda,如果是其它版本的CUDA(比如12.2),可能需要自己build,比较麻烦。所以如果可能的话请尽量使用CUDA12.1(一台机器只能安装一个版本的CUDA Driver,但是可以安装多个版本的CUDA Toolkit和CUDNN,所以不用担心冲突)。
如果有多个版本的CUDA和CUDNN并且默认(/usr/local/cuda符号链接)不是CUDA 12.1,可以设置环境变量CUDA_HOME:
export CUDA_HOME=/usr/local/cuda-12.1
export PATH="$CUDA_HOME/bin:$PATH"
export LD_LIBRARY_PATH="$CUDA_HOME/lib64:$LD_LIBRARY_PATH"
说明:对于编译来说只需要CUDA_HOME就可以了,但是为了前面的nvcc使用CUDA 12.1自带的版本,我还设置的PATH。设置LD_LIBRARY_PATH似乎不太必要,不过设置了一般没有坏处。
下载cuSPARSELt,我安装的0.6.0。选择和你的系统及架构对应的版本下载解压到一个位置就行,我把它放到了~/libcusparse_lt-linux-x86_64-0.6.0.6-archive。这是一个系数矩阵乘法库,如果没有也不影响Pytorch的build。
安装依赖
conda create -n torchbuild python=3.9
conda activate torchbuild


conda install cmake ninja

git clone --recursive https://github.com/pytorch/pytorch.git
pip install -r requirements.txt
如下安装是Linux环境的依赖,如果是其它系统请参考官方文档。
conda install intel::mkl-static intel::mkl-include
conda install -c pytorch magma-cuda121
如果您的CUDA版本不是12.1,请去这里寻找是否有对应的版本。如果没有,请参考Build PyTorch from Source with CUDA 12.2.1 with Ubuntu 22.04自行编译magma-cuda。
另外如果需要triton支持需要通过”make triton”安装。不过我暂时没时间研究triton,所以没有试过。
编译
export _GLIBCXX_USE_CXX11_ABI=1

export CMAKE_PREFIX_PATH=${CONDA_PREFIX:-"$(dirname $(which conda))/../"}
DEBUG=1 MAX_JOBS=96 python setup.py develop
第一个环境变量告诉gcc使用新的c++ abi;第二个环境变量告诉CMAKE应该把libtorch等安装到哪个地方;最后一个就是标准(deprecated)的python安装方法,其中DEBUG=1告诉CMAKE构建debug版本,MAX_JOBS是编译器(默认ninja)任务数,请根据您的机器cpu数量设置。默认值是num_sockets * core_per_socket * threds_per_core。
由于CMAKE的输出很多,我们可以把输出通过tee定向到文件,同时为了编译cuSPARSELt,我们需要设置:
CUSPARSELT_ROOT_DIR=/home/ubuntu/libcusparse_lt-linux-x86_64-0.6.0.6-archive/lib CUSPARSELT_INCLUDE_PATH=/home/ubuntu/libcusparse_lt-linux-x86_64-0.6.0.6-archive/include DEBUG=1 MAX_JOBS=96 python setup.py develop 2>&1 |tee build.log
如果您的系统没有MPI或者构建的MPI不支持CUDA,我们可以使用”USE_MPI=0”禁用它。
编译需要一定的时间,根据机器的配置不同,可能需要几十分钟甚至几个小时。如果编译过程出现错误,请仔细阅读build.log的错误信息。后面我也会简单的介绍一下setup.py和CMakeLists.txt,读者可以结合CMAKE的输出诊断问题。
测试pytorch
(torchbuild) ubuntu@VM-4-3-ubuntu:~/miniconda3/envs/torchbuild/lib$ python
Python 3.9.18 (main, Sep 11 2023, 13:41:44)
[GCC 11.2.0] :: Anaconda, Inc. on linux
Type "help", "copyright", "credits" or "license" for more information.
>>> import torch
Traceback (most recent call last):
  File "<stdin>", line 1, in <module>
  File "/nas/lili/codes/pt/torchsrc/pytorch/torch/__init__.py", line 237, in <module>
    from torch._C import *  # noqa: F403
ImportError: /home/ubuntu/miniconda3/envs/torchbuild/bin/../lib/libstdc++.so.6: version `GLIBCXX_3.4.30' not found (required by /nas/lili/codes/pt/torchsrc/pytorch/torch/lib/libtorch_python.so)
>>>
我在import torch时就出现了”GLIBCXX_3.4.30 nout found”的问题,根据GLIBCXX 3.4.30 not found in conda environment,我们只需要增加一个符号链接就可以了:
$ ln -sf /usr/lib/x86_64-linux-gnu/libstdc++.so.6 /home/ubuntu/miniconda3/envs/torchbuild/bin/../lib/libstdc++.so.6
docker build
如果您的环境太老或者没有权限更新gcc和cuda等,可以考虑PyTorch’s DevContainer,此外可以参考PyTorch Official VSCode DevContainer和Build and Develop PyTorch。
Pytorch代码结构
$ tree -d -L 1
.
├── android
├── aten
├── benchmarks
├── binaries
├── build
├── c10
├── caffe2
├── cmake
├── docs
├── functorch
├── ios
├── modules
├── mypy_plugins
├── scripts
├── test
├── third_party
├── tools
├── torch
├── torch.egg-info
└── torchgen
torch
这个目录主要包括python代码,我们”import torch”命令就是加载torch包里的很多模块。
csrc
该目录下都是C/C++源码,Python绑定C++的相关code都在这个目录里面,同时也包含了对PyTorch核心库的一些封装。我们后面调试会看到的torch/csrc/stub.c和Module.cpp就在这个目录下。
_C
C扩展torch模块,里面的pyi定义了python可以使用的接口。
其它
其它目录就不一一列举了,基本上我们使用pytorch主要就是使用这些包里的模块。有些功能完全有python实现,而有些是通过扩展模块由C++实现。后面我们在介绍setup.py时会看到它们。
aten
a tensor library 的缩写,这个库设计之初主要是为Tensor服务,不支持autograd。
$ tree aten/src -L 2 -d
aten/src
├── ATen
│   ├── benchmarks
│   ├── core
│   ├── cpu
│   ├── cuda
│   ├── cudnn
│   ├── detail
│   ├── functorch
│   ├── hip
│   ├── metal
│   ├── miopen
│   ├── mkl
│   ├── mps
│   ├── native
│   ├── nnapi
│   ├── ops
│   ├── quantized
│   ├── templates
│   ├── test
│   ├── vulkan
│   └── xpu
└── THC
- src/Aten/core:aten的核心基础库。目前这个库里面的代码正在逐渐地迁移到c10目录下面。
- src/Aten/native:PyTorch的算子库,这个目录下面的算子都是CPU的算子。对于一些专门CPU指令优化的算子会在子目录里面。
- src/Aten/native/cuda:cuda算子实现。
c10
caffe2 aten的缩写,PyTorch的核心库,支持服务端和移动端。
 tree c10/ -d  -L 2
c10/
├── benchmark
├── core
│   └── impl
├── cuda
│   ├── impl
│   └── test
├── hip
├── macros
├── mobile
├── test
│   ├── core
│   └── util
├── util
└── xpu
    ├── impl
    └── test
c10和aten的关系是:
ATen: This is the tensor library in PyTorch. It’s a namespace where the tensor operations and functions of PyTorch are defined. It’s built on top of the C++ standard library and is designed to be a replacement for Torch’s TH library. The name “ATen” might be a play on words, since it’s a ten-sor library.
c10: This is the core library for PyTorch. It contains the basic building blocks that PyTorch uses, including things like TensorImpl, the tensor metadata structure, and the dispatcher, which is responsible for routing operator calls to the correct kernel implementation. The name “c10” is short for “caffe2”, the deep learning framework that PyTorch merged with.
As for the differences between ATen and c10, as mentioned above, ATen is the tensor library, where all tensor operations are defined, whereas c10 is the core library, responsible for routing operator calls to the correct kernel implementation.
tools
PyTorch中很多相似源码都是脚本通过模板自动生成的,这个文件夹下面就放着自动生成代码的脚本。
caffe2
caffe2,目前版本默认不编译,大部分读者应该不会感兴趣。如果需要编译可以增加环境变量”BUILD_CAFFE2=1”。
cmake
cmake脚本。
functorch
functorch是类似于JAX的可组合函数转换工具,用于PyTorch。
android
Android相关代码。
ios
ios相关代码。
modules
$ tree modules -L 1
modules
├── CMakeLists.txt
├── detectron
├── module_test
├── observers
└── rocksdb
不太了解其作用,应该很少有人会用到。
third_party
依赖的第三方库。
setup.py简介
关于setup.py,读者可以参考翻译:Building and Distributing Packages with Setuptools。我们这里介绍一下Pytorch的setup.py。
这个文件很长,有1400多行,但是并不复杂。
main函数
    # the list of runtime dependencies required by this built package
    install_requires = [
        "filelock",
        "typing-extensions>=4.8.0",
        "sympy",
        "networkx",
        "jinja2",
        "fsspec",
        'mkl>=2021.1.1,<=2021.4.0; platform_system == "Windows"',
    ]

    # Parse the command line and check the arguments before we proceed with
    # building deps and setup. We need to set values so `--help` works.
    dist = Distribution()
    dist.script_name = os.path.basename(sys.argv[0])
    dist.script_args = sys.argv[1:]
    try:
        dist.parse_command_line()
    except setuptools.distutils.errors.DistutilsArgError as e:
        print(e)
        sys.exit(1)

    mirror_files_into_torchgen()
    if RUN_BUILD_DEPS:
        build_deps()

    (
        extensions,
        cmdclass,
        packages,
        entry_points,
        extra_install_requires,
    ) = configure_extension_build()

    install_requires += extra_install_requires

    extras_require = {
        "optree": ["optree>=0.9.1"],
        "opt-einsum": ["opt-einsum>=3.3"],
    }

    # Read in README.md for our long_description
    with open(os.path.join(cwd, "README.md"), encoding="utf-8") as f:
        long_description = f.read()

    version_range_max = max(sys.version_info[1], 12) + 1
    torch_package_data = [
        "py.typed",
        "bin/*",
        "test/*",
        "*.pyi",
        "_C/*.pyi",
        "cuda/*.pyi",

        # ..........

    ]

    if get_cmake_cache_vars()["BUILD_CAFFE2"]:
        torch_package_data.extend(
            [
                "include/caffe2/**/*.h",
                "include/caffe2/utils/*.h",
                "include/caffe2/utils/**/*.h",
            ]
        )
    if get_cmake_cache_vars()["USE_TENSORPIPE"]:
        torch_package_data.extend(
            [
                "include/tensorpipe/*.h",
                "include/tensorpipe/channel/*.h",
                "include/tensorpipe/channel/basic/*.h",
                "include/tensorpipe/channel/cma/*.h",
                "include/tensorpipe/channel/mpt/*.h",
                "include/tensorpipe/channel/xth/*.h",
                "include/tensorpipe/common/*.h",
                "include/tensorpipe/core/*.h",
                "include/tensorpipe/transport/*.h",
                "include/tensorpipe/transport/ibv/*.h",
                "include/tensorpipe/transport/shm/*.h",
                "include/tensorpipe/transport/uv/*.h",
            ]
        )
    torchgen_package_data = [
        # Recursive glob doesn't work in setup.py,
        # https://github.com/pypa/setuptools/issues/1806
        # To make this robust we should replace it with some code that
        # returns a list of everything under packaged/
        "packaged/ATen/*",
        "packaged/ATen/native/*",
        "packaged/ATen/templates/*",
        "packaged/autograd/*",
        "packaged/autograd/templates/*",
    ]
    setup(
        name=package_name,
        version=version,
        description=(
            "Tensors and Dynamic neural networks in "
            "Python with strong GPU acceleration"
        ),
        long_description=long_description,
        long_description_content_type="text/markdown",
        ext_modules=extensions,
        cmdclass=cmdclass,
        packages=packages,
        entry_points=entry_points,
        install_requires=install_requires,
        extras_require=extras_require,
        package_data={
            "torch": torch_package_data,
            "torchgen": torchgen_package_data,
            "caffe2": [
                "python/serialized_test/data/operator_test/*.zip",
            ],
        },
        url="https://pytorch.org/",
        download_url="https://github.com/pytorch/pytorch/tags",
        author="PyTorch Team",
        author_email="packages@pytorch.org",
        python_requires=f">={python_min_version_str}",
        # PyPI package information.
        classifiers=[
            "Development Status :: 5 - Production/Stable",
            "Intended Audience :: Developers",
            "Intended Audience :: Education",
            "Intended Audience :: Science/Research",
            "License :: OSI Approved :: BSD License",
            "Topic :: Scientific/Engineering",
            "Topic :: Scientific/Engineering :: Mathematics",
            "Topic :: Scientific/Engineering :: Artificial Intelligence",
            "Topic :: Software Development",
            "Topic :: Software Development :: Libraries",
            "Topic :: Software Development :: Libraries :: Python Modules",
            "Programming Language :: C++",
            "Programming Language :: Python :: 3",
        ]
        + [
            f"Programming Language :: Python :: 3.{i}"
            for i in range(python_min_version[1], version_range_max)
        ],
        license="BSD-3",
        keywords="pytorch, machine learning",
    )
代码虽然很长,但是逻辑比较简单。主要的代码是:
    if RUN_BUILD_DEPS:
        build_deps()

    (
        extensions,
        cmdclass,
        packages,
        entry_points,
        extra_install_requires,
    ) = configure_extension_build()

    ....
    setup(
        name=package_name,
        version=version,
        description=(
            "Tensors and Dynamic neural networks in "
            "Python with strong GPU acceleration"
        ),
        .....
build_deps
使用CMAKE构建third_party里的依赖。虽然使用Python实现的,但是Python代码只是做一下整合的工作,最终调用的还是cmake:
cmake -GNinja -DBUILD_PYTHON=True -DBUILD_TEST=True -DCMAKE_BUILD_TYPE=Debug -DCMAKE_INSTALL_PREFIX=/nas/lili/codes/pt/torchsrc/pytorch/torch -DCMAKE_PREFIX_PATH=/home/ubuntu/miniconda3/envs/torchbuild/lib/python3.9/site-packages -DNUMPY_INCLUDE_DIR=/home/ubuntu/miniconda3/envs/torchbuild/lib/python3.9/site-packages/numpy/core/include -DPYTHON_EXECUTABLE=/home/ubuntu/miniconda3/envs/torchbuild/bin/python -DPYTHON_INCLUDE_DIR=/home/ubuntu/miniconda3/envs/torchbuild/include/python3.9 -DPYTHON_LIBRARY=/home/ubuntu/miniconda3/envs/torchbuild/lib/libpython3.9.a -DTORCH_BUILD_VERSION=2.4.0a0+git8168338 -DUSE_NUMPY=True /nas/lili/codes/pt/torchsrc/pytorch

cmake --build . --target install --config Debug -- -j 96
configure_extension_build
这个函数里比较关键的是如下代码:
    C = Extension(
        "torch._C",
        libraries=main_libraries,
        sources=main_sources,
        language="c",
        extra_compile_args=main_compile_args + extra_compile_args,
        include_dirs=[],
        library_dirs=library_dirs,
        extra_link_args=extra_link_args
        + main_link_args
        + make_relative_rpath_args("lib"),
    )
    extensions.append(C)

    cmdclass = {
        "bdist_wheel": wheel_concatenate,
        "build_ext": build_ext,
        "clean": clean,
        "install": install,
        "sdist": sdist,
    }
Extension组成的数组就是后面的setup函数ext_modules参数。而cmdclass通过自定义的命令扩展了setuptools来实现自定义的安装过程。这其中最重要的是build_ext,后面我们会讲到。
setup
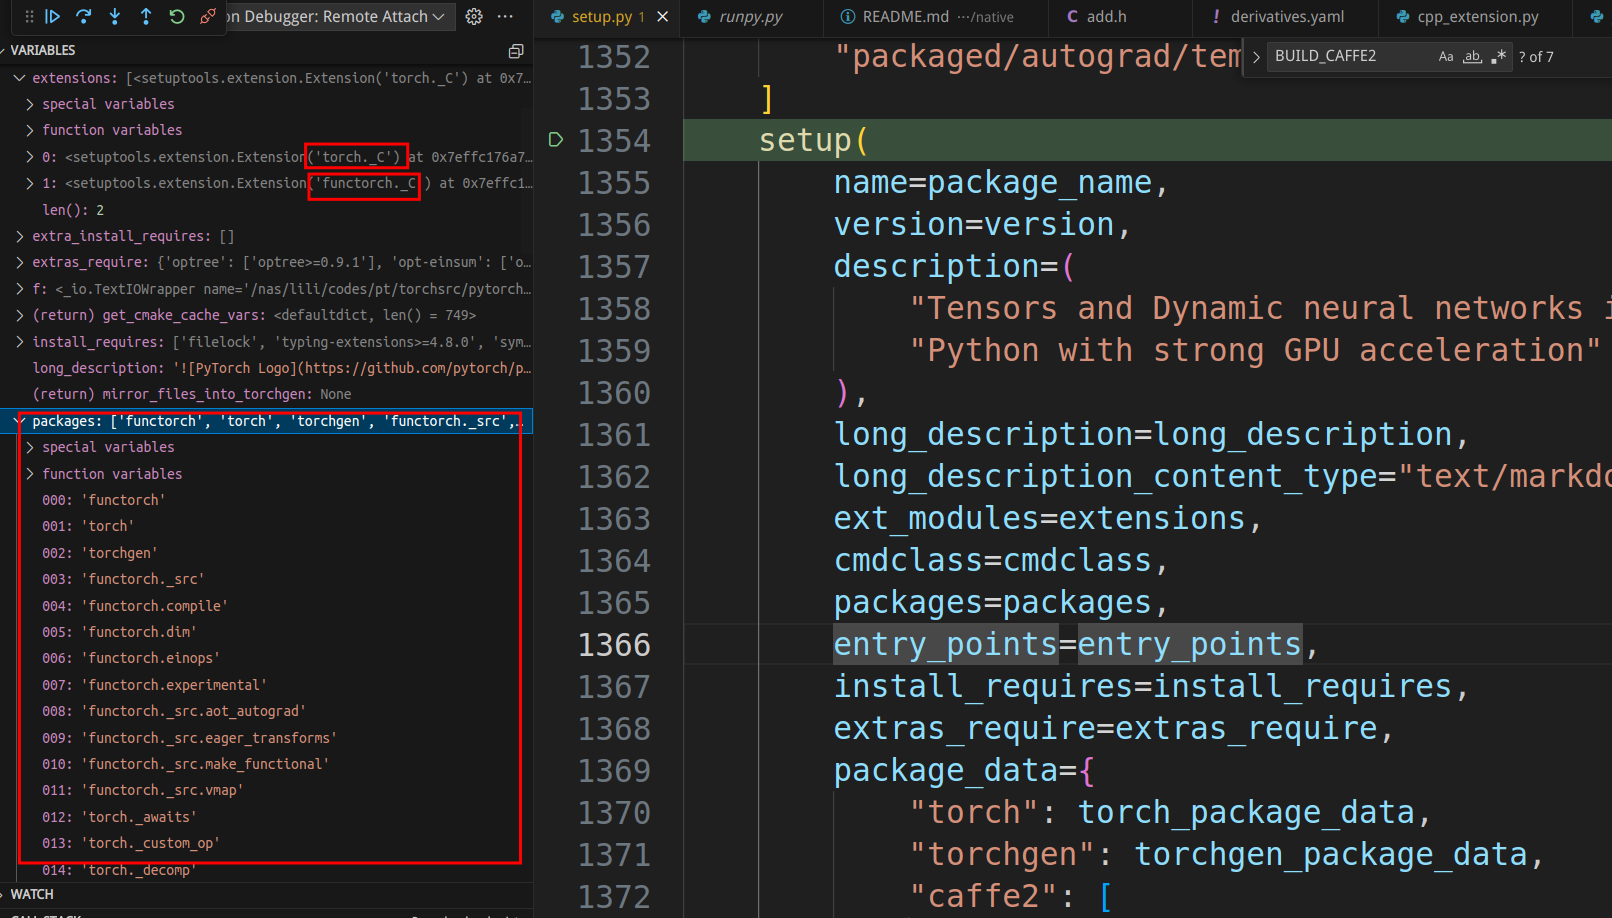
我们可以看到,setup主要的工作就是把torch包里的模块安装进去,左边的调试窗口显示了少量包名,目前的版本总共有299个包!而ext_modules只有”torch._C”和”functorch._C”,但是我们知道它们背后是所有的第三方依赖代码以及aten和c10等核心C++代码。
build_ext
这个类会调用run来进行扩展的构建,代码比较长,我们可以对照下面的log输出来看。
class build_ext(setuptools.command.build_ext.build_ext):


    def run(self):
        # Report build options. This is run after the build completes so # `CMakeCache.txt` exists and we can get an
        # accurate report on what is used and what is not.
        cmake_cache_vars = defaultdict(lambda: False, cmake.get_cmake_cache_variables())
        if cmake_cache_vars["USE_NUMPY"]:
            report("-- Building with NumPy bindings")
        else:
            report("-- NumPy not found")
        if cmake_cache_vars["USE_CUDNN"]:
            report(
                "-- Detected cuDNN at "
                + cmake_cache_vars["CUDNN_LIBRARY"]
                + ", "
                + cmake_cache_vars["CUDNN_INCLUDE_DIR"]
            )
        else:
            report("-- Not using cuDNN")
        if cmake_cache_vars["USE_CUDA"]:
            report("-- Detected CUDA at " + cmake_cache_vars["CUDA_TOOLKIT_ROOT_DIR"])
        else:
            report("-- Not using CUDA")
        if cmake_cache_vars["USE_XPU"]:
            report("-- Detected XPU runtime at " + cmake_cache_vars["SYCL_LIBRARY_DIR"])
        else:
            report("-- Not using XPU")
        if cmake_cache_vars["USE_MKLDNN"]:
            report("-- Using MKLDNN")
            if cmake_cache_vars["USE_MKLDNN_ACL"]:
                report("-- Using Compute Library for the Arm architecture with MKLDNN")
            else:
                report(
                    "-- Not using Compute Library for the Arm architecture with MKLDNN"
                )
            if cmake_cache_vars["USE_MKLDNN_CBLAS"]:
                report("-- Using CBLAS in MKLDNN")
            else:
                report("-- Not using CBLAS in MKLDNN")
        else:
            report("-- Not using MKLDNN")
        if cmake_cache_vars["USE_NCCL"] and cmake_cache_vars["USE_SYSTEM_NCCL"]:
            report(
                "-- Using system provided NCCL library at {}, {}".format(
                    cmake_cache_vars["NCCL_LIBRARIES"],
                    cmake_cache_vars["NCCL_INCLUDE_DIRS"],
                )
            )
        elif cmake_cache_vars["USE_NCCL"]:
            report("-- Building NCCL library")
        else:
            report("-- Not using NCCL")
        if cmake_cache_vars["USE_DISTRIBUTED"]:
            if IS_WINDOWS:
                report("-- Building without distributed package")
            else:
                report("-- Building with distributed package: ")
                report(
                    "  -- USE_TENSORPIPE={}".format(cmake_cache_vars["USE_TENSORPIPE"])
                )
                report("  -- USE_GLOO={}".format(cmake_cache_vars["USE_GLOO"]))
                report("  -- USE_MPI={}".format(cmake_cache_vars["USE_OPENMPI"]))
        else:
            report("-- Building without distributed package")
        if cmake_cache_vars["STATIC_DISPATCH_BACKEND"]:
            report(
                "-- Using static dispatch with backend {}".format(
                    cmake_cache_vars["STATIC_DISPATCH_BACKEND"]
                )
            )
        if cmake_cache_vars["USE_LIGHTWEIGHT_DISPATCH"]:
            report("-- Using lightweight dispatch")
        if cmake_cache_vars["BUILD_EXECUTORCH"]:
            report("-- Building Executorch")

        if cmake_cache_vars["USE_ITT"]:
            report("-- Using ITT")
        else:
            report("-- Not using ITT")

        # Do not use clang to compile extensions if `-fstack-clash-protection` is defined
        # in system CFLAGS
        c_flags = str(os.getenv("CFLAGS", ""))
        if (
            IS_LINUX
            and "-fstack-clash-protection" in c_flags
            and "clang" in os.environ.get("CC", "")
        ):
            os.environ["CC"] = str(os.environ["CC"])

        # It's an old-style class in Python 2.7...
        setuptools.command.build_ext.build_ext.run(self)

        if IS_DARWIN and package_type != "conda":
            self._embed_libomp()

        # Copy the essential export library to compile C++ extensions.
        if IS_WINDOWS:
            build_temp = self.build_temp

            ext_filename = self.get_ext_filename("_C")
            lib_filename = ".".join(ext_filename.split(".")[:-1]) + ".lib"

            export_lib = os.path.join(
                build_temp, "torch", "csrc", lib_filename
            ).replace("\\", "/")

            build_lib = self.build_lib

            target_lib = os.path.join(build_lib, "torch", "lib", "_C.lib").replace(
                "\\", "/"
            )

            # Create "torch/lib" directory if not exists.
            # (It is not created yet in "develop" mode.)
            target_dir = os.path.dirname(target_lib)
            if not os.path.exists(target_dir):
                os.makedirs(target_dir)

            self.copy_file(export_lib, target_lib)

    def build_extensions(self):
        self.create_compile_commands()
        # The caffe2 extensions are created in
        # tmp_install/lib/pythonM.m/site-packages/caffe2/python/
        # and need to be copied to build/lib.linux.... , which will be a
        # platform dependent build folder created by the "build" command of
        # setuptools. Only the contents of this folder are installed in the
        # "install" command by default.
        # We only make this copy for Caffe2's pybind extensions
        caffe2_pybind_exts = [
            "caffe2.python.caffe2_pybind11_state",
            "caffe2.python.caffe2_pybind11_state_gpu",
            "caffe2.python.caffe2_pybind11_state_hip",
        ]
        i = 0
        while i < len(self.extensions):
            ext = self.extensions[i]
            if ext.name not in caffe2_pybind_exts:
                i += 1
                continue
            fullname = self.get_ext_fullname(ext.name)
            filename = self.get_ext_filename(fullname)
            report(f"\nCopying extension {ext.name}")

            relative_site_packages = (
                sysconfig.get_path("purelib")
                .replace(sysconfig.get_path("data"), "")
                .lstrip(os.path.sep)
            )
            src = os.path.join("torch", relative_site_packages, filename)
            if not os.path.exists(src):
                report(f"{src} does not exist")
                del self.extensions[i]
            else:
                dst = os.path.join(os.path.realpath(self.build_lib), filename)
                report(f"Copying {ext.name} from {src} to {dst}")
                dst_dir = os.path.dirname(dst)
                if not os.path.exists(dst_dir):
                    os.makedirs(dst_dir)
                self.copy_file(src, dst)
                i += 1

        # Copy functorch extension
        for i, ext in enumerate(self.extensions):
            if ext.name != "functorch._C":
                continue
            fullname = self.get_ext_fullname(ext.name)
            filename = self.get_ext_filename(fullname)
            fileext = os.path.splitext(filename)[1]
            src = os.path.join(os.path.dirname(filename), "functorch" + fileext)
            dst = os.path.join(os.path.realpath(self.build_lib), filename)
            if os.path.exists(src):
                report(f"Copying {ext.name} from {src} to {dst}")
                dst_dir = os.path.dirname(dst)
                if not os.path.exists(dst_dir):
                    os.makedirs(dst_dir)
                self.copy_file(src, dst)

        setuptools.command.build_ext.build_ext.build_extensions(self)
在我的机器上运行上面代码的输出:
running build_ext
-- Building with NumPy bindings
-- Detected cuDNN at ,
-- Detected CUDA at /usr/local/cuda-12.1
-- Not using XPU
-- Using MKLDNN
-- Not using Compute Library for the Arm architecture with MKLDNN
-- Not using CBLAS in MKLDNN
-- Building NCCL library
-- Building with distributed package:
  -- USE_TENSORPIPE=True
  -- USE_GLOO=True
  -- USE_MPI=False
-- Building Executorch
-- Using ITT
Copying functorch._C from functorch/functorch.so to /nas/lili/codes/pt/torchsrc/pytorch/build/lib.linux-x86_64-cpython-39/functorch/_C.cpython-39-x86_64-linux-gnu.so
Creating /home/ubuntu/miniconda3/envs/torchbuild/lib/python3.9/site-packages/torch.egg-link (link to .)
torch 2.4.0a0+git8168338 is already the active version in easy-install.pth
Installing convert-caffe2-to-onnx script to /home/ubuntu/miniconda3/envs/torchbuild/bin
Installing convert-onnx-to-caffe2 script to /home/ubuntu/miniconda3/envs/torchbuild/bin
Installing torchrun script to /home/ubuntu/miniconda3/envs/torchbuild/bin

Installed /nas/lili/codes/pt/torchsrc/pytorch
Processing dependencies for torch==2.4.0a0+git8168338
Searching for fsspec==2024.3.1
Best match: fsspec 2024.3.1
Adding fsspec 2024.3.1 to easy-install.pth file

Using /home/ubuntu/miniconda3/envs/torchbuild/lib/python3.9/site-packages
Searching for Jinja2==3.1.3
Best match: Jinja2 3.1.3
Adding Jinja2 3.1.3 to easy-install.pth file

Using /home/ubuntu/miniconda3/envs/torchbuild/lib/python3.9/site-packages
Searching for networkx==3.2.1
Best match: networkx 3.2.1
Adding networkx 3.2.1 to easy-install.pth file

Using /home/ubuntu/miniconda3/envs/torchbuild/lib/python3.9/site-packages
Searching for sympy==1.12
Best match: sympy 1.12
Adding sympy 1.12 to easy-install.pth file
Installing isympy script to /home/ubuntu/miniconda3/envs/torchbuild/bin

Using /home/ubuntu/miniconda3/envs/torchbuild/lib/python3.9/site-packages
Searching for typing-extensions==4.9.0
Best match: typing-extensions 4.9.0
Adding typing-extensions 4.9.0 to easy-install.pth file

Using /home/ubuntu/.local/lib/python3.9/site-packages
Searching for filelock==3.13.1
Best match: filelock 3.13.1
Adding filelock 3.13.1 to easy-install.pth file

Using /home/ubuntu/miniconda3/envs/torchbuild/lib/python3.9/site-packages
Searching for MarkupSafe==2.1.5
Best match: MarkupSafe 2.1.5
Adding MarkupSafe 2.1.5 to easy-install.pth file

Using /home/ubuntu/miniconda3/envs/torchbuild/lib/python3.9/site-packages
Searching for mpmath==1.3.0
Best match: mpmath 1.3.0
Adding mpmath 1.3.0 to easy-install.pth file

Using /home/ubuntu/miniconda3/envs/torchbuild/lib/python3.9/site-packages
Finished processing dependencies for torch==2.4.0a0+git8168338
build_extensions
    def build_extensions(self):
        self.create_compile_commands()
create_compile_commands生成ninja要执行的命令:

我们看到总共有8528个cpp文件要编译,图中显示了其中一个的编译命令。
调试
调试python代码
我们假设要调试的pytorch代码运行在远程服务器上,请参考VSCode远程调试Python。调试Pytorch的python代码和调试其它python代码没有区别。
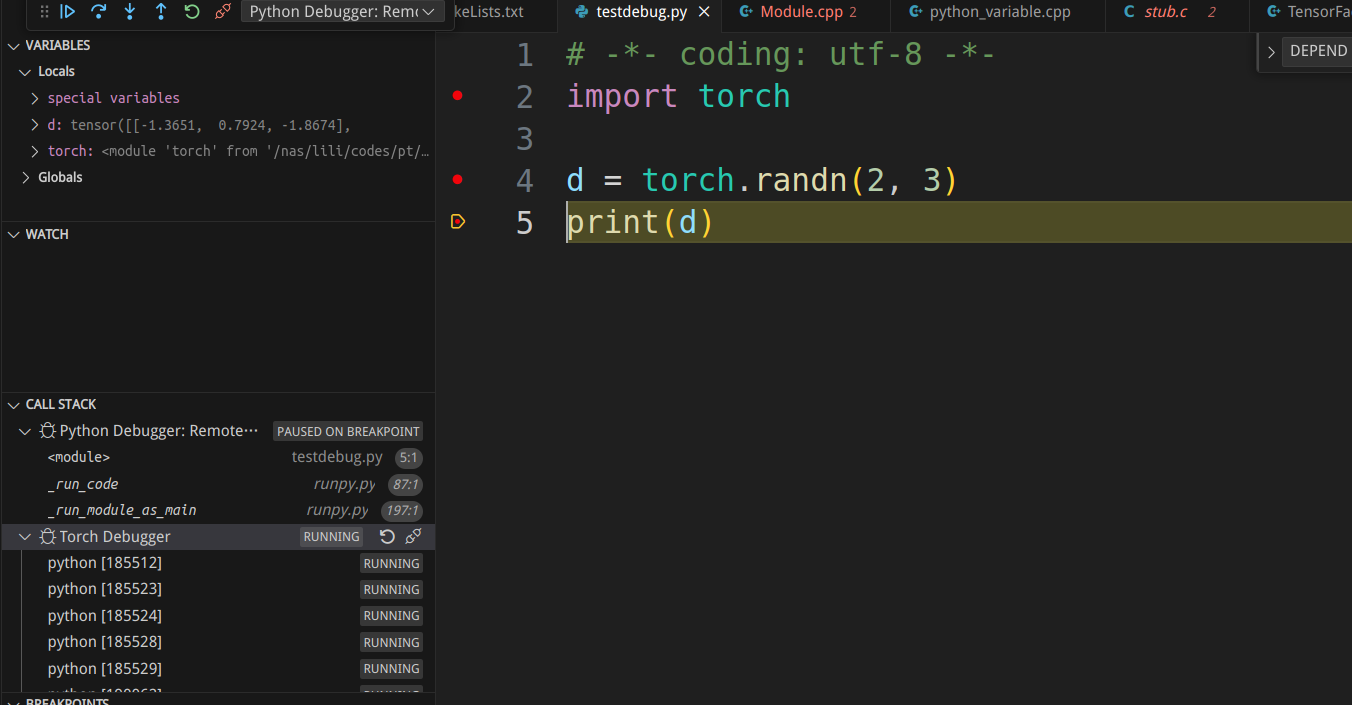
我们写一个最简单的pytorch代码来调试:
# testdebug.py

import torch

d = torch.randn(2, 3)
print(d)
lauch.json:
{
    "version": "0.2.0",
    "configurations": [
        {
            "name": "Python Debugger: Remote Attach",
            "type": "debugpy",
            "request": "attach",
            "connect": {
                "host": "remote server ip address",
                "port": 5678
            },
            "justMyCode": false
        }
    ]
在服务器端启动:
python -Xfrozen_modules=off -m debugpy --listen 0.0.0.0:5678 --wait-for-client testdebug.py
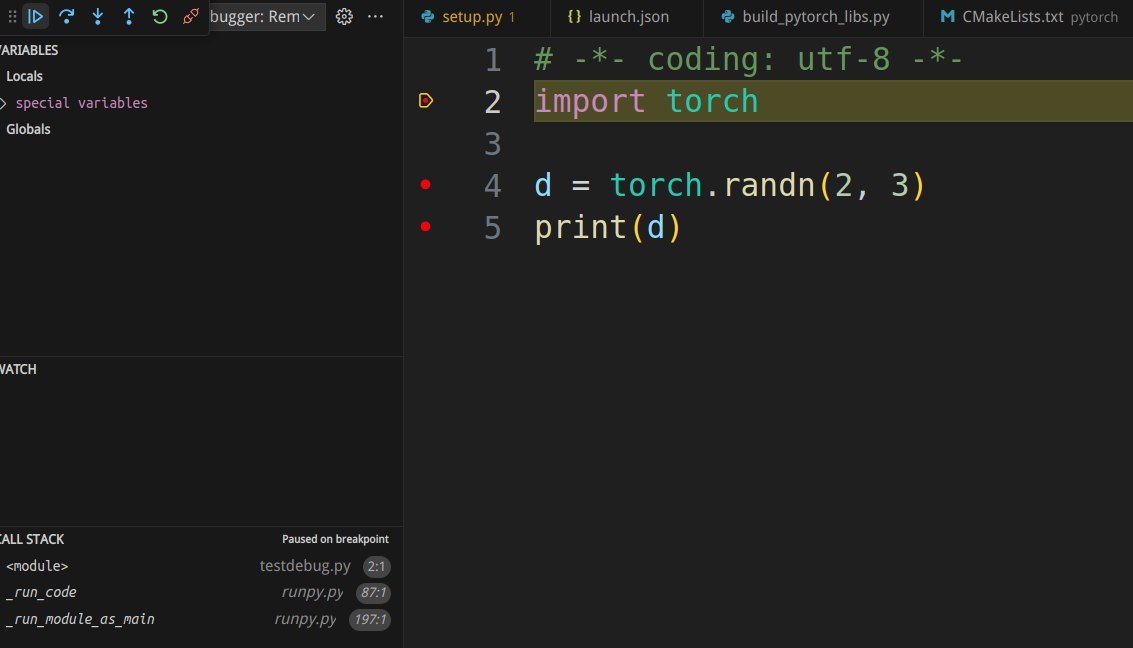
调试界面如下图所示:
调试c++代码
首先我们需要清楚一个概念,所谓的pytorch c++代码指的是c extension。所以我们其实是在调试CPython里的pytorch c扩展。我们这里Python解释器(CPython)是release的版本,并不能调试,不过我们的目的也不是调试Python解释器,而是调试pytorch的c扩展。如果你需要调试Python,请参考Python Debug Build。
我们使用gdb来调试,如果没有安装请参考网上的资料进行安装,比如Ubuntu可以使用:
sudo apt update
sudo apt install gdb
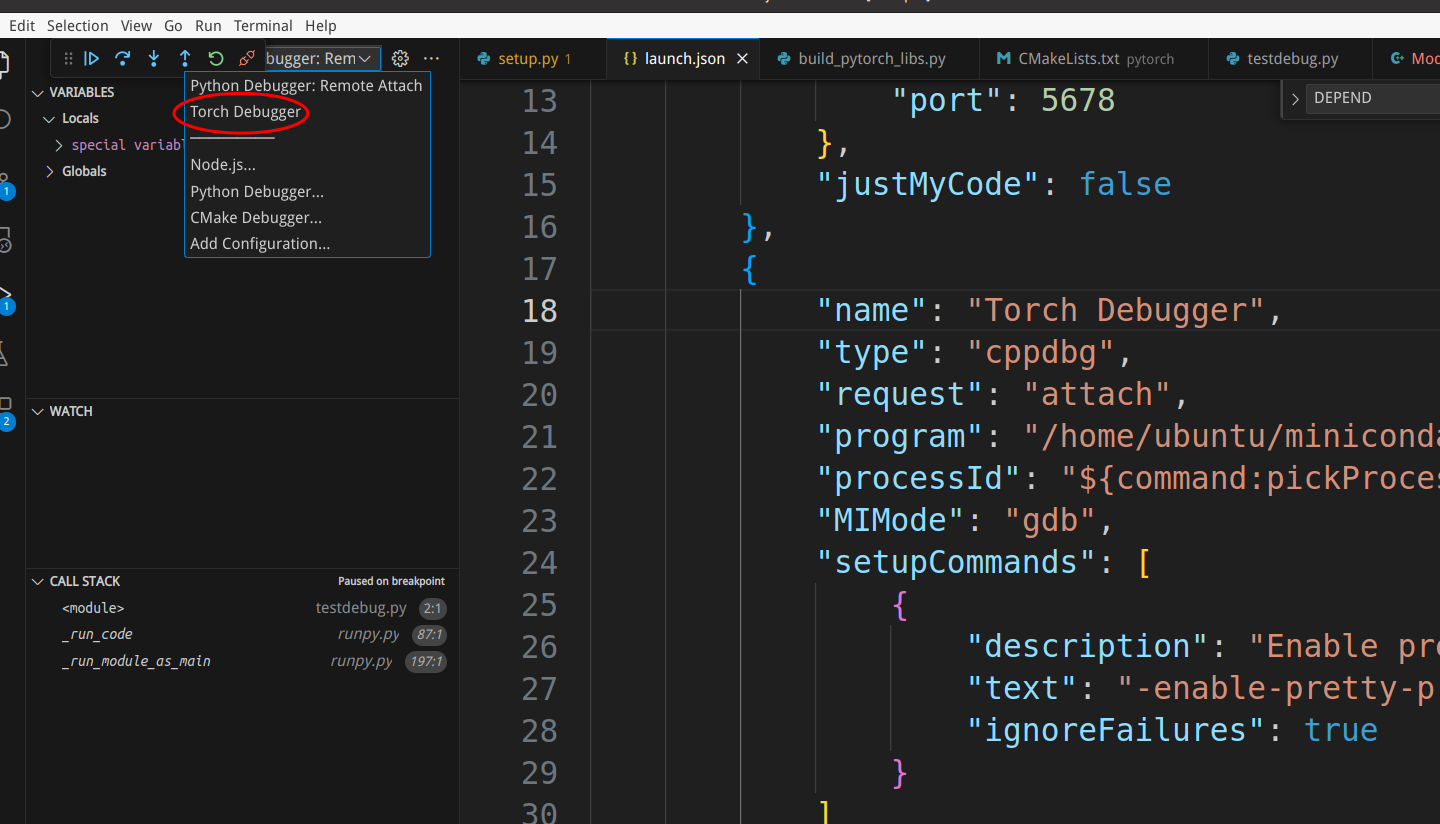
接着我们需要在launch.json里增加gdb调试:
{
    "version": "0.2.0",
    "configurations": [
        {
            "name": "Python Debugger: Remote Attach",
            "type": "debugpy",
            "request": "attach",
            "connect": {
                "host": "server ip",
                "port": 5678
            },
            "justMyCode": false
        },
        {
            "name": "Torch Debugger",
            "type": "cppdbg",
            "request": "attach",
            "program": "/home/ubuntu/miniconda3/envs/torchbuild/bin/python",
            "processId": "${command:pickProcess}",
            "MIMode": "gdb",
            "setupCommands": [
                {
                    "description": "Enable pretty-printing for gdb",
                    "text": "-enable-pretty-printing",
                    "ignoreFailures": true
                }
            ]

        }
    ]
}
其中”program”需要改成conda虚拟环境中的python解释器的路径。在使用gdb进行attach时,默认需要root权限。如果用户有sudo权限,会弹出窗口让输入密码。但是远程调试无法弹出窗口,因此可能出现问题。它可能提示”Authentication is needed to run /usr/bin/gdb' as the super user",[Start gdb fail when attach debug a program.(Authentication is needed to run /usr/bin/gdb’ as the super user)](Authentication is needed to run `/usr/bin/gdb’ as the super user)。解决方法可以参考Troubleshoot attaching to processes using GDB,最简单的方法就是:
echo 0| sudo tee /proc/sys/kernel/yama/ptrace_scope
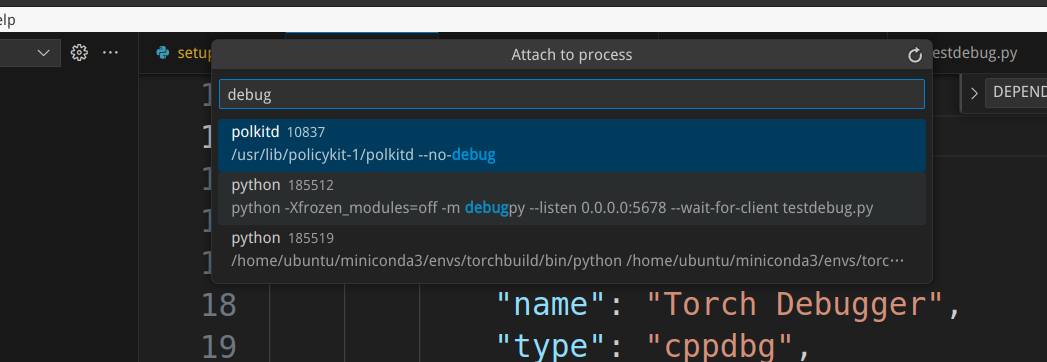
接下来让我们attach到刚才启动的python解释器。我们选择启动”Torch Debugger”,这个时候会弹出窗口让我们选择要attach的进程,我们可以用启动进程的关键词搜索:
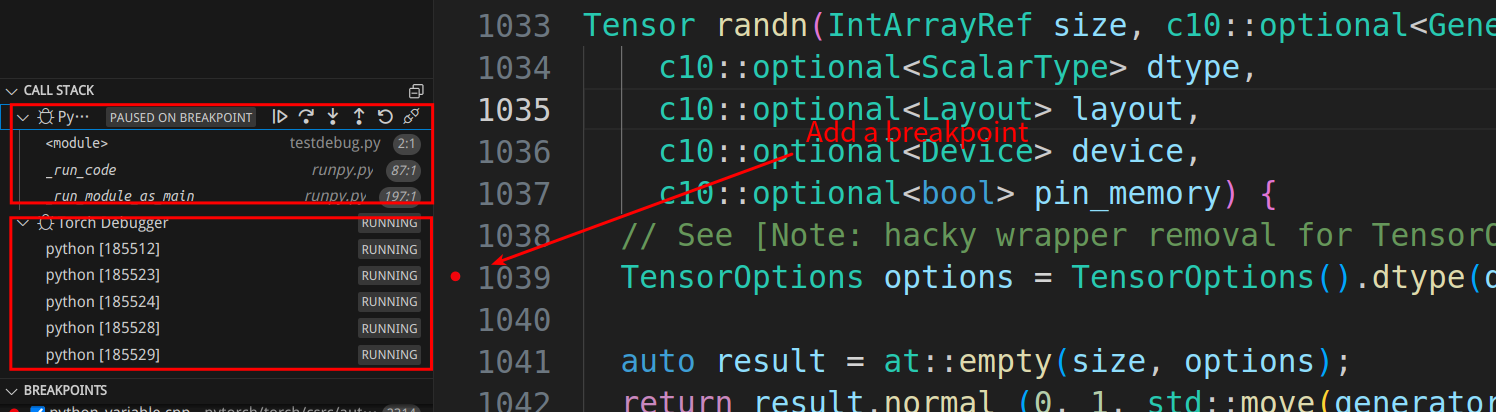
我们可以在torch/csrc/Module.cpp的static PyObject* THPModule_initExtension函数增加断点,这是初始化torch._C模块时被调用的函数。另外我们可以在aten/src/ATen/native/TensorFactories.cpp的randn函数里增加断点。
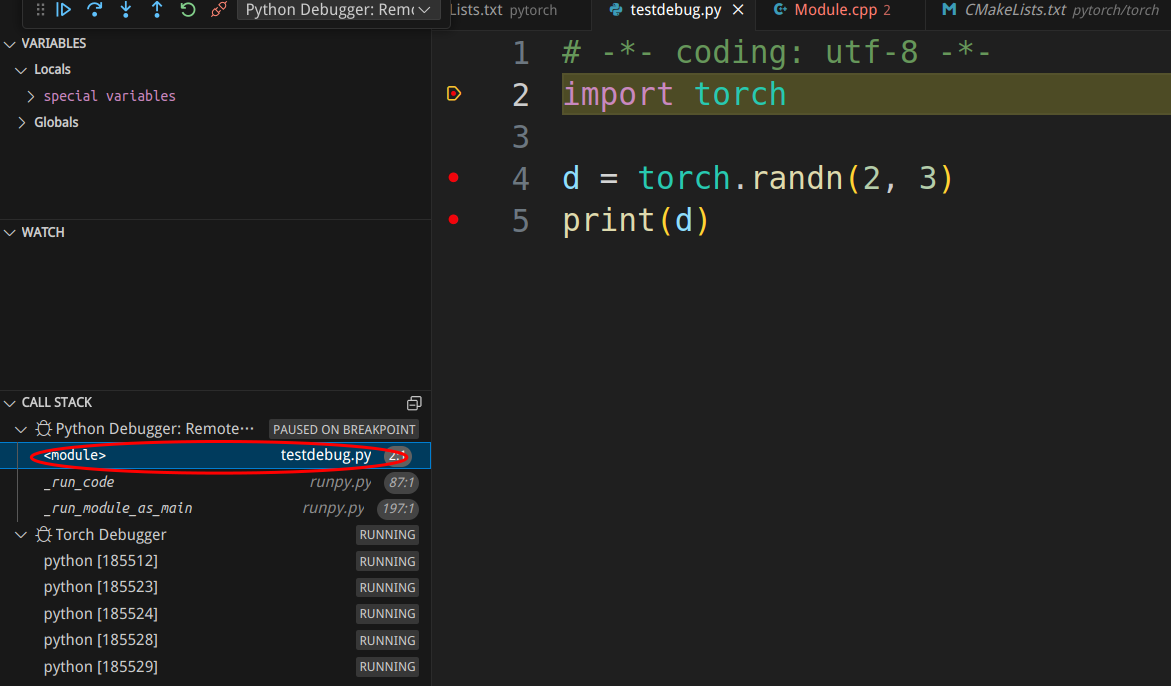
我们看到左边的callstack显示了两个调试。Python的调试处于Pause状态,而Pytorch的调试还在运行。我们可以点击Python的callstack,发现python代码停止了第一条”import torch”的语句上。
接下来我们F10单步执行python代码,让它执行import语句,这个时候Pytorch的调试会进入断点(导入torch可能需要几分钟的时间):
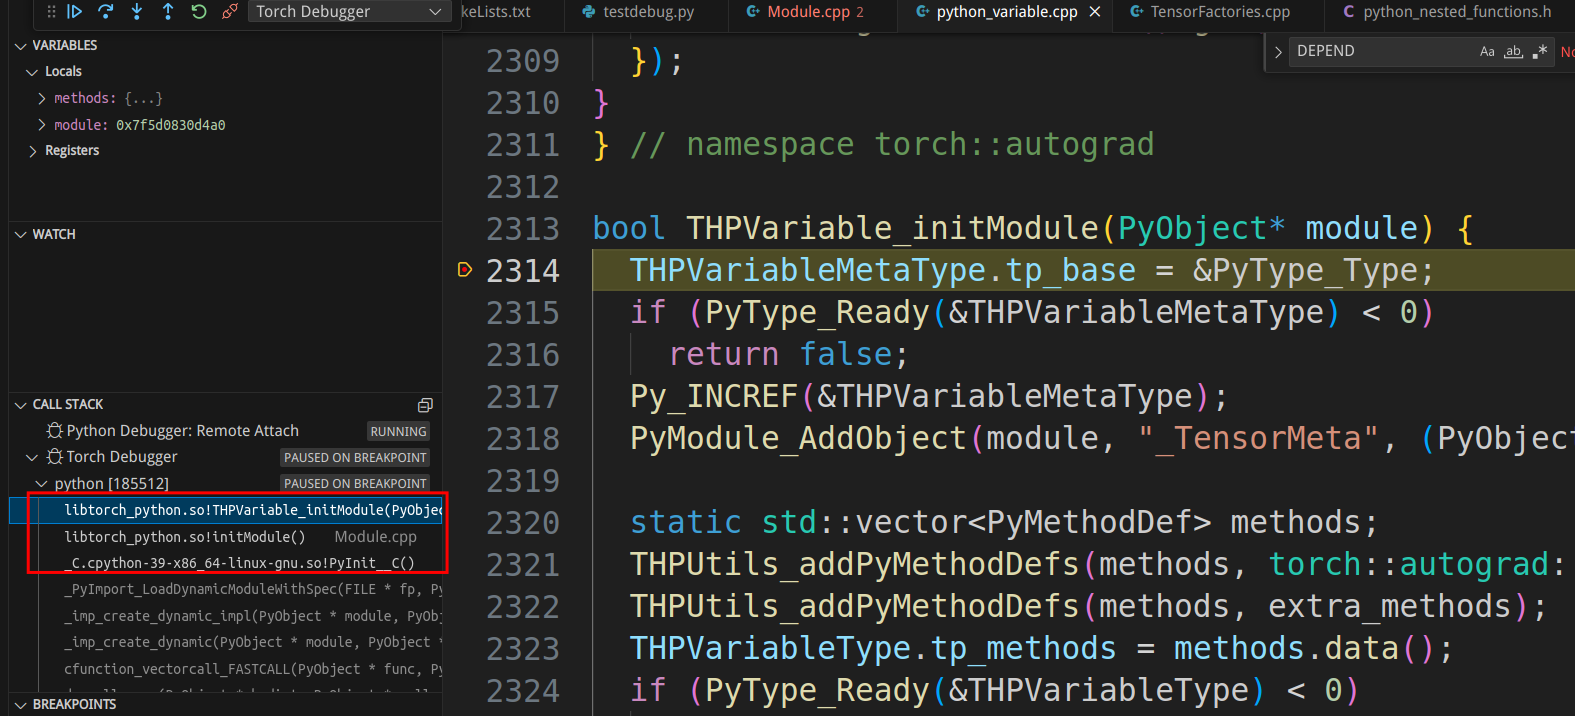
确实停在了”bool THPVariable_initModule(PyObject* module) {“,我们也可以查看调用堆栈,比如点击第三行可以进入torch/csrc/stub.c:

这就是Python初始化c扩展模块的地方。想深入了解的读者可以参考Building a Python C Extension Module、Python/C API Reference Manual和Extending and Embedding the Python Interpreter
为了继续运行Python解释器,我们按F5键恢复运行。经过一段时间之后完成”import torch”的执行,断点继续回到Python代码:
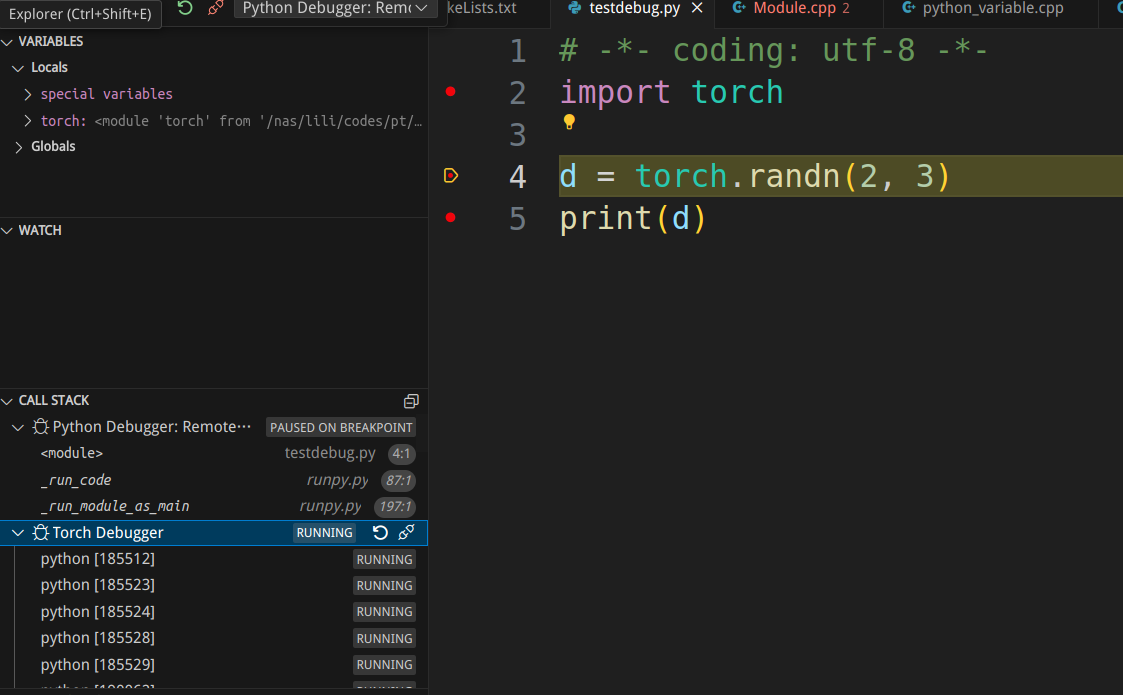
接着我们F10单步执行”d = torch.randn(2, 3)”,断点又到了pytorch:
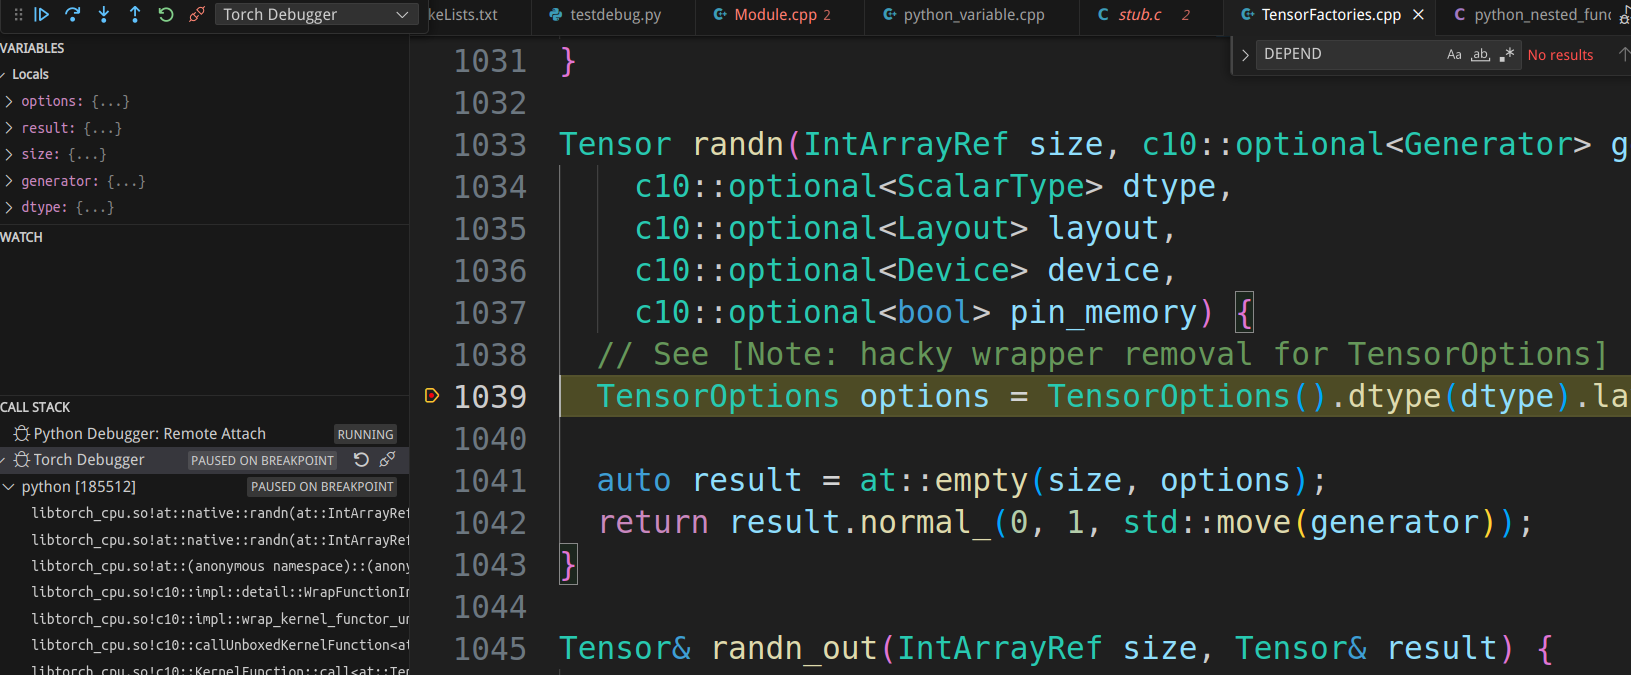
按F5继续完成randn在pytorch的执行,断点回到python:
参考资料
- pytorch source code
- A Tour of PyTorch Internals (Part I)
- PyTorch Internals Part II - The Build System
- PyTorch – Internal Architecture Tour
- 小白学习pytorch源码(一)
- where can I find the source code for torch.unique()?
- PyTorch 2 Internals – Talk
- What’s the difference between aten and c10?
- PyTorch源码学习系列 - 1.初识
- 显示Disqus评论(需要科学上网)