本文介绍Stanford CoreNLP的用法。Stanford CoreNLP是斯坦福(Stanford) NLP组(Group)用Java开发的NLP工具,它支持很多中语言(包括中文)。它提高工具来实现分词、分句、词性标注、句法分析等许多常见的NLP任务。
目录
简介
Stanford CoreNLP是Stanford NLP Group基于他们的科研工作开发的一套NLP工具。Stanford NLP组的成员来自语言学系和计算机系,它是Stanford AI实验室的一部分。注意,最近Stanford也基于Python开发了一套纯深度学习的工具Stanford NLP。不过目前的版本还是0.1.1,还是属于比较早期的版本,而且很遗憾的是没有简体中文的支持(只有繁体中文)。
Stanford CoreNLP提供了一系列工具来处理人类的自然语言。它可以实现词干还原,标注词的词性。识别人名、地名、日期和时间等命名实体,同时还可以对它们进行归一化。对句子进行乘法句法分析和依存句法分析。还包括指代消解、情感分析和关系抽取等。
它的特点是:
-
一个集成多种工具的NLP工具集。
-
快速稳定,经过十多年的迭代目前的版本已经是3.9.2 。
-
使用最近的技术,整体的效果非常好。
-
支持多种语言(包括中文)
-
支持多种编程语言(通过Web Service的方式)
-
可以独立作为一个Web服务运行
Stanford CoreNLP的目的是为了让文本分析更加容易。Stanford CoreNLP不是一个工具,而是集成了Stanford NLP Group多年研究的一系列工具。它把这些工具组成一个PipeLine,高效的用这些工具逐个的分析文本。我们也可以需要非常轻松的开启或者关闭某些工具。目前Stanford CoreNLP集成的工具包括:词性标注(Part of Speech Tagger、命名实体识别(Named Entity Reconizer)、 句法分析(parsing)、指代消解(Coreference Resolution)、情感分析(Sentiment Analysis)和开放关系抽取等等。而且我们可以加入自定义的Annotator(后面我们会介绍它的概念),从而扩展Stanford CoreNLP的功能。
下图的例子展示了实体识别、指代消解和依存句法分析。
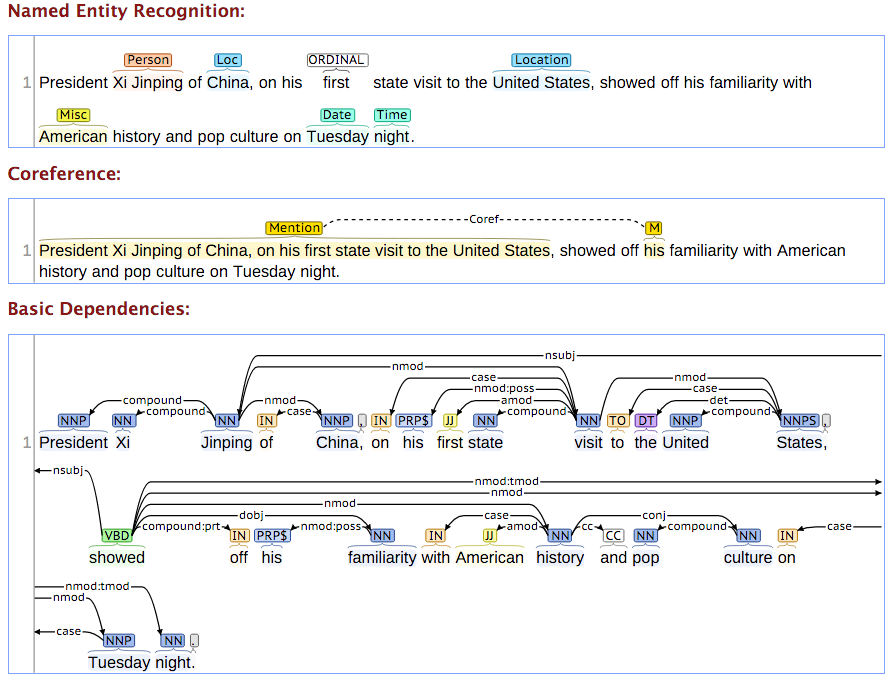 图:CoreNLP示例
Annotation和Annotator
Stanford CoreNLP把文本的处理过程用PipeLine来表示,也就是顺序串行的进行处理,每一步都是一个Annotator,它的处理结果会放到Annotation里。Annotation可以认为是一个Map,存储处理的结果。不同的Annotator都会生成一个Map,然后用不同的Key存储起来。因此不同的Annotator的处理结构都会保存下来(后面的Annotator的结果不会覆盖前面的结果)。有些Annotator需要依赖其它的Annotator,比如词性标注要求先分词。因此我们在配置PipeLine的时候需要合理的设置使用哪些Annotator,如果我们需要使用pos(词性标注),那么前面一定要用tokenize(分词)。
Annotation可以看成一个Map。一开始只有一个元素,key是TextAnnotation.class(edu.stanford.nlp.ling.CoreAnnotations的一个内部静态类),Value是一个String,表示输入的文本。然后进行后续的分词、分句、词性标注等等。分词依赖原始的输入(TextAnnotation),分词的结果会用key TokensAnnotation.class存储起来。而词性标注有依赖于分词的结果,因此它在处理的时候会假设key TokensAnnotation.class已经存在,否则会抛出异常。
Annotator是一个接口,它主要定义如下方法:
public interface Annotator{
    void annotate(final Annotation a);
}
annotate方法的作用就是对输入的Annotation进行处理,它会用约定的key去取依赖的Annotation结果,然后处理完了把新的Annotation(可能多个)保存到Annotation里。
PipeLine的基类是AnnotationPipeline,它也实现了Annotator接口。AnnotationPipeline可以看成一个Annotator的List,它的annotate方法会这个list的每一个Annotator调用annotate方法对Annotation进行处理。完整的PipeLine处理流程如下图所示。
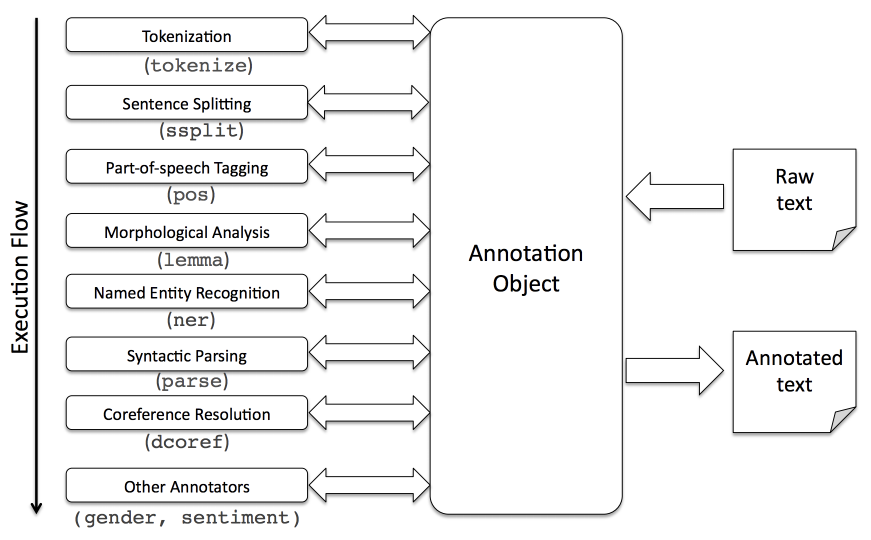 图:完整PipeLine
Stanford CoreNLP提供配置的方式来设置开启或者关闭那些Annotator,但是我们也可以用代码自己来构造PipeLine:
  public AnnotationPipeline buildPipeline() {
    AnnotationPipeline pl = new AnnotationPipeline();
    pl.addAnnotator(new TokenizerAnnotator(false));
    pl.addAnnotator(new WordsToSentencesAnnotator(false));
    pl.addAnnotator(new POSTaggerAnnotator(false));
    pl.addAnnotator(new MorphaAnnotator(false));
    pl.addAnnotator(new TimeAnnotator("sutime", props));
    pl.addAnnotator(new PhraseAnnotator(phrasesFile, false));
    return pl;
  }
我们可以这样使用Pipeline来进行annotate:
AnnotationPipeline pipeline = buildPipeline();
Annotation annotation = new Annotation("It's like a topography that is made from cartography of me.");
pipeline.annotate(annotation);
上面是老的API,后面我们也会介绍新的API,但是概念是基本相同的。
Annotator列表
这里我们介绍一些常见的Annotator,每个Annotator都是解决一个具体的NLP Task,比如分词。但是本文不会介绍这些Task的详细细节,有兴趣的读者请参考NLP的资料,比如Speech and Language Processing第三版草稿。另外也打个广告,可以参考作者即将出版的《深度学习理论与实战》,里面会介绍NLP基本的一些概念。
tokenize
这个Annotator名字对应的是TokenizerAnnotator类,它的作用是把句子变成Token列表。对于英文等有空格分开的语言来说这项任务会比较简单(其实也没有想象中简单,比如怎么处理’s,连字符等等),对于中文这样没有空格切分词的语言需要使用更加复杂的切分工具(Segmenter),比如CRFs这样的统计模型。注意:Tokenizer是更大的一个术语,对于英语,Tokenizer可能是一个基于规则(状态机)的算法;而对于中文需要更加复杂的Segmenter,感兴趣的读者可以参考Stanford Word Segmenter 和Parsing Chinese text with Stanford NLP。
关于中文分词,作者想多说几句。目前网上有各种开源的分词工具,都是宣传准确率多么多么高。大家在比较不同的分词工具是一定要注意它们使用的训练数据和测试数据。目前学术界最常用的分词语料库一般都是新闻类的语料,比如PKU语料库,使用的是人民日报的新闻。但是很多人(包括作者)的工作处理的都是非常口语化的数据,另外不同的语料库的标注规范也千差万别,比如CTB使用的标注规范和PKU的差别也很大。因此实际使用时绝对没有宣传的那么高的准确率,而且很多时候分词只是最终任务的一个步骤,分词错误也不见得对最后的模型有特别大的影响。在实际应用中,分词比较大的问题是新词,虽然可以通过统计模型(比如CRFs或者LSTM)来自动做新词发现,但是有时候使用领域词典更加简单而且可控。最新的很多End-to-End的模型甚至不分词,直接基于字符来构建模型(这对于中文是非常合适的,对于英文也可以使用BPE等算法把词切分成更细粒度的子词(SubWord)。
CoreNLP中文分词使用的是CTB7的规范,读者可以在这里下载。
我们可以使用下面的命令行测试tokenize:
java -cp "./*" -Xmx1g edu.stanford.nlp.pipeline.StanfordCoreNLP -annotators tokenize,ssplit \
         -file example.txt -outputFormat text
在运行前我们需要下载软件,此外我们还需要下载模型,读者可以根据使用的语言去这里下载模型。我们这里需要下载英文和中文的模型,然后把它放到classpath里。
我们需要准备一个example.txt,它的内容为:
Joe Smith was born in California.
It will probably rain on Friday.
运行后得到一个example.txt.out,它的内容为:
Document: ID=example.txt (2 sentences, 14 tokens)

Sentence #1 (7 tokens):
Joe Smith was born in California.

Tokens:
[Text=Joe CharacterOffsetBegin=0 CharacterOffsetEnd=3]
[Text=Smith CharacterOffsetBegin=4 CharacterOffsetEnd=9]
[Text=was CharacterOffsetBegin=10 CharacterOffsetEnd=13]
[Text=born CharacterOffsetBegin=14 CharacterOffsetEnd=18]
[Text=in CharacterOffsetBegin=19 CharacterOffsetEnd=21]
[Text=California CharacterOffsetBegin=22 CharacterOffsetEnd=32]
[Text=. CharacterOffsetBegin=32 CharacterOffsetEnd=33]

Sentence #2 (7 tokens):
It will probably rain on Friday.

Tokens:
[Text=It CharacterOffsetBegin=34 CharacterOffsetEnd=36]
[Text=will CharacterOffsetBegin=37 CharacterOffsetEnd=41]
[Text=probably CharacterOffsetBegin=42 CharacterOffsetEnd=50]
[Text=rain CharacterOffsetBegin=51 CharacterOffsetEnd=55]
[Text=on CharacterOffsetBegin=56 CharacterOffsetEnd=58]
[Text=Friday CharacterOffsetBegin=59 CharacterOffsetEnd=65]
[Text=. CharacterOffsetBegin=65 CharacterOffsetEnd=66]
我们可以看到输出为两个句子,每个句子都是一些Token,每个Token有一个Text,此外还有CharacterOffsetBegin和CharacterOffsetEnd用于标识Token在输入文本中的开始和结束下标。
我们也可以通过Java代码来实现上面的过程,使用Java代码,我们可以更加方便的获取更多信息。
public class PipelineDemo {

  public static void main(String[] args) {
    // set up pipeline properties
    Properties props = new Properties();
    props.setProperty("annotators", "tokenize,ssplit");

    // set up pipeline
    StanfordCoreNLP pipeline = new StanfordCoreNLP(props);

    // the following has examples for the new Core Wrapper API and the older
    // Annotation API
    // example using Core Wrappers (new API designed to make it easier to work with
    // NLP data)
    System.out.println("---");
    System.out.println("Accessing Tokens In A CoreDocument");
    System.out.println("(text, char offset begin, char offset end)");
    CoreDocument exampleDocument = new CoreDocument("Here is the text to tokenize.");
    // annotate document
    pipeline.annotate(exampleDocument);
    // access tokens from a CoreDocument
    // a token is represented by a CoreLabel
    List<CoreLabel> firstSentenceTokens = exampleDocument.sentences().get(0).tokens();
    // this for loop will print out all of the tokens and the character offset info
    for (CoreLabel token : firstSentenceTokens) {
      System.out.println(token.word() + "\t" + token.beginPosition() + "\t" + token.endPosition());
    }
    // example using older Annotation API
    System.out.println("---");
    System.out.println("Accessing Tokens In An Annotation");
    System.out.println("(text, char offset begin, char offset end)");
    Annotation exampleAnnotation = new Annotation("Here is the text to tokenize.");
    pipeline.annotate(exampleAnnotation);
    CoreMap firstSentence = exampleAnnotation.get(CoreAnnotations.SentencesAnnotation.class).get(0);
    // this for loop will print out all of the tokens and the character offset info
    for (CoreLabel token : firstSentence.get(CoreAnnotations.TokensAnnotation.class)) {
      System.out.println(token.word() + "\t" + token.beginPosition() + "\t" + token.endPosition());
    }
  }
}
读者可以在这里获取完整源代码。
代码首先构造Properties对象,然后设置使用的annotators为”tokenize,ssplit”,表示只分词和分句。
接下来用”StanfordCoreNLP pipeline = new StanfordCoreNLP(props);”构造Pipeline。注意StanfordCoreNLP类继承了AnnotationPipeline,它可以通过配置文件来构造Pipeline。
有了pipeline之后就可以对文本进行出来,这里演示了两种API,其实差别并不大。新的API更加简单一点,不需要知道Annotation的key(各种类),但是原理是一样的。
使用新的API非常简单:
	CoreDocument exampleDocument = new CoreDocument("Here is the text to tokenize.");
	// annotate document
	pipeline.annotate(exampleDocument);
构造一个CoreDocument对象,传入要分析的文本,然后使用pipeline.annotate方法就可以了,下面我们看怎么读取分析的结果:
	List<CoreLabel> firstSentenceTokens = exampleDocument.sentences().get(0).tokens();
	// this for loop will print out all of the tokens and the character offset info
	for (CoreLabel token : firstSentenceTokens) {
		System.out.println(token.word() + "\t" + token.beginPosition()
			 + "\t" + token.endPosition());
	}
exampleDocument.sentences()可以拿到所有的句子,我们这里只有一个句子,因此可以再用get(0)拿到第一个句子的处理结果。一个句子又有很多Token,因此调用tokens()方法拿到多个Token(List
老的API和前面介绍的概念更加接近:
	Annotation exampleAnnotation = new Annotation("Here is the text to tokenize.");
	pipeline.annotate(exampleAnnotation);
我们首先构造一个Annotation,然后使用pipeline.annotate()方法进行处理,下面是获取结果的代码:
  CoreMap firstSentence = exampleAnnotation.get(CoreAnnotations.SentencesAnnotation.class).get(0);
  // this for loop will print out all of the tokens and the character offset info
  for (CoreLabel token : firstSentence.get(CoreAnnotations.TokensAnnotation.class)) {
    System.out.println(token.word() + "\t" + token.beginPosition() + "\t" + token.endPosition());
  }
我们首先需要拿到分句的结果,这需要使用key CoreAnnotations.SentencesAnnotation.class,接着我们需要拿到一个句子的所有Token,这需要key CoreAnnotations.TokensAnnotation.class。最后拿到的是CoreLabel,这和前面是一样的。可以看到,使用老的API会稍微麻烦一点。
ssplit
ssplit对应的是WordsToSentenceAnnotator,它实现的是分句的功能。前面我们其实已经用到了分句,我们在下面的代码里指定了我们的PipeLine是先分词后分句:
props.setProperty("annotators", "tokenize,ssplit");
如果换成
props.setProperty("annotators", "ssplit,tokenize");
则会抛出异常,提示annotator “ssplit” requires annotation “TextAnnotation”。我们知道TextAnnotation是tokenize的结果之一(还有token的位置等其它结果),因此分句是依赖分词的。
有些读者可能奇怪,为什么分词在分句之前呢?对于英文来说,分句主要依赖一些标点符号,比如”,.!?”等。但是英文有些单词比如”Mr. St.”是包含以英文句号的,如果直接用标点分句会有问题,因此Stanford CoreNLP首先分词,分完词后就可以用标点分句。但是这对中文并不合适,因为英文的分词是基于规则(状态机),它的时间复杂度是O(n)的。而中文是使用CRFs模型,它在预测是时使用动态规划来解码,其复杂度是$O(n^2)$。中文我们更适合先分句在分词,因此对于中文,我们通常先自行分句,然后用Pipeline来处理每一个句子。为了避免CoreNLP再分句,我们可以在Properties里设置ssplit.isOneSentence为True,则它就把输入的文本当成一个句子处理。
lemma
lemma对应MorphaAnnotator,它的作用是进行词的主干分析,比如把goes还原成go。对于中文来说不需要这个步骤。
pos
pos对应POSTaggerAnnotator,它实现词性标注(Part of Speech Tagging),它使用的是最大熵模型(而不是CRFs)。
对于英文,使用的是Penn Tree bank的tagset。使用的训练数据是华尔街日报(WSJ)0-18节,使用19-20节来测试。CoreNLP的默认使用的是”edu/stanford/nlp/models/pos-tagger/english-left3words/english-left3words-distsim.tagger”,它的准确率是97.01%。这不是最好的模型,但是它的速度比较快。如果想要更准确的模型,读者可以去词性标注工具下载并使用wsj-0-18-bidirectional-distsim.tagger。
注:CoreNLP其实是把Stanford NLP Group的很多工具集成到一起,但是我们仍然可以单独的使用每一个工具,比如词性标注工具。
对于中文,使用的是CTB7的tagset。默认使用的模型是edu/stanford/nlp/models/pos-tagger/chinese-distsim/chinese-distsim.tagger,它的准确率是93.99%。详细的CTB7的标注规范可以在这里下载
我们可以在前面的pipeline构造时加入”pos”就可以实现词性标注,除此之外,我们也可以用代码单独实现词性标注:
public class TaggerDemo {

  private TaggerDemo() {
  }

  public static void main(String[] args) throws Exception {
    InputStream input = TaggerDemo.class.getResourceAsStream("/"+MaxentTagger.DEFAULT_JAR_PATH);

    MaxentTagger tagger = new MaxentTagger(input);

    List<List<HasWord>> sentences = MaxentTagger.tokenizeText(new StringReader("Karma of humans is AI"));

    for (List<HasWord> sentence : sentences) {

      List<TaggedWord> tSentence = tagger.tagSentence(sentence);

      System.out.println(SentenceUtils.listToString(tSentence, false));

    }

  }

}
完整代码可以在这里下载。
ner
简介
ner对应NERClassifierCombiner,用于实现命名实体识别。默认会使用CRF模型,也可以使用基于规则的算法。如果读者像训练自己的模型,可以参考这里。详细的介绍请参考这里。
对应英文来说,人名地名等使用CRF模型来识别,但是对于日期时间等使用的是规则的方法。对于数字(日期里的),还需要归一化。归一化的值使用key NormalizedNamedEntityTagAnnotation存放到Annotation里。基于规则的方法不同语言使用的规则是不同的,这里注意介绍英语的规则。NERClassifierCombiner最后会把统计模型和规则的输出融合起来输出最终识别结果。
对于英语来说,默认的ner会识别(PERSON, LOCATION, ORGANIZATION, MISC)等实体,也识别(MONEY, NUMBER, ORDINAL, PERCENT)等数字实体,还会识别(DATE, TIME, DURATION, SET)等时间实体。此外规则方法还会识别(EMAIL, URL, CITY, STATE_OR_PROVINCE, COUNTRY, NATIONALITY, RELIGION, (job) TITLE, IDEOLOGY, CRIMINAL_CHARGE, CAUSE_OF_DEATH)等11种细化的实体,这样总共可以识别23类命名实体。它使用了CoNLL, ACE, MUC和ERE等语料库的实体作为训练数据。
流程
整个识别流程比较复杂,使用类edu.stanford.nlp.pipeline.NERCombinerAnnotator实现。下面介绍主要的流程。
统计模型
使用CRF模型在很大的训练数据上训练了3个模型。预测的时候会顺序的运行这3个模型。
# tags: LOCATION, ORGANIZATION, PERSON
edu/stanford/nlp/models/ner/english.all.3class.distsim.crf.ser.gz
# tags: DATE, LOCATION, MONEY, ORGANIZATION, PERCENT, PERSON, TIME
edu/stanford/nlp/models/ner/english.muc.7class.distsim.crf.ser.gz
# LOCATION, MISC, ORGANIZATION, PERSON
edu/stanford/nlp/models/ner/english.conll.4class.distsim.crf.ser.gz
可以看到这3个模型会有重叠的tag,我们可以用ner.combinationMode来控制怎么融合3个模型的结果。如果ner.combinationMode是NORMAL,那么优先使用前面的模型的结果。比如3class识别了某个Token是PERSON,那么即使后面的4class把它识别成LOCATION,也会优先使用3class的结果。我们也可以把它改成HIGH_RECALL,对于上面的情况就会识别成LOCATION。
如果我们不想使用统计模型,那么可以设置ner.model为空字符串。
数字序列和SUTime
接下来就是使用规则的方法来识别数字序列和时间,它会输出NUMBER, ORDINAL, MONEY, DATE和TIME等实体。我们可以设置ner.applyNumericClassifiers为false来跳过这个步骤。数字序列使用edu.stanford.nlp.ie.regexp.NumberSequenceClassifier来识别。如果要跳过SUTime的识别,我们需要设置ner.useSUTime为False。
细粒度的ner
细粒度的ner会识别下面的tag:
CAUSE_OF_DEATH, CITY, COUNTRY, CRIMINAL_CHARGE, EMAIL,
IDEOLOGY, NATIONALITY, RELIGION, STATE_OR_PROVINCE, TITLE, URL
我们可以设置ner.applyFineGrained为False来关掉这个功能。
RegexNER
除此之外,我们还可以使用RegexNER来自己定义识别实体的规则。RegexNer类似与正则表达式,但是它是基于Token(词)而不是字符串的(因此不太适合中文)。
比如下面的规则:
Los Angeles CITY LOCATION,MISC 1.0
如果当前的tag是LOCATION或者MISC或者O,则规则引擎会把Los Angeles识别成CITY,并且优先级是1.0(如果多个规则冲突时选择优先级高的规则)。
类似的:
Bachelor of (Arts|Science) DEGREE MISC 1.0
会识别Bachelor of Arts或者Bachelor of Science。
tag合并
这是通过EntityMentionsAnnotator这个sub-annotator来实现的,它的作用是把连续的相同实体合并成更大的实体。
ner的tag有两种:basic和advanced。basic的tag就是PERSON和ORGANIZATION等tag;而advanced的tag是序列标注模型使用的方法BIO等,比如B-PERSON和I-PERSON表示人名的开始和继续,不了解的读者可以参考CRF模型的介绍。
对于basic的tag,它会把连续的相同的tag合并成大的tag,比如
(Joe PERSON) (Smith PERSON) (Jane PERSON) (Smith PERSON)
会合并成一个大的实体Joe Smith Jane Smith。而
(Joe B-PERSON) (Smith I-PERSON) (Jane B-PERSON) (Smith I-PERSON)
会识别成两个实体Joe Smith和Jane Smith。显然,advanced tag能实现连续出现的两个实体的识别。
示例代码
我们可以用前面的pipeline来实现ner,只需要加入ner就行:
public class NERPipelineDemo {

  public static void main(String[] args) {
    // set up pipeline properties
    Properties props = new Properties();
    props.setProperty("annotators", "tokenize,ssplit,pos,lemma,ner");

    // set up pipeline
    StanfordCoreNLP pipeline = new StanfordCoreNLP(props);
    // make an example document
    CoreDocument doc = new CoreDocument("Joe Smith is from Seattle.");
    // annotate the document
    pipeline.annotate(doc);
    // view results
    System.out.println("---");
    System.out.println("entities found");
    for (CoreEntityMention em : doc.entityMentions())
      System.out.println("\tdetected entity: \t" + em.text() + "\t" + em.entityType());
    System.out.println("---");
    System.out.println("tokens and ner tags");
    String tokensAndNERTags = doc.tokens().stream().map(
		token -> "(" + token.word() + "," + token.ner() + ")")
        	.collect(Collectors.joining(" "));
    System.out.println(tokensAndNERTags);
  }

}
运行的结果为:
---
entities found
	detected entity: 	Joe Smith	PERSON
	detected entity: 	Seattle	CITY
---
tokens and ner tags
(Joe,PERSON) (Smith,PERSON) (is,O) (from,O) (Seattle,CITY) (.,O)
可以看到,tag的结果是Joe和Smith都是PERSON,而CoreEntityMention会把Joe和Smith合并成一个PERSON实体。
parse
parse对应的是ParserAnnotator,实现成分句法分析(Constituency Parsing)。有很多的Parsing算法,对应英语来说,CoreNLP默认使用englishPCFG.ser.gz模型,说明它使用的是PCFG算法。除此之外,我们也可以使用速度更快但是准确率稍低一点的Shift-Reduce Parser。要切换到SR-Parser,我们只需要配置parse.model为”edu/stanford/nlp/models/srparser/englishSR.ser.gz”就可以了。
英文是使用Penn Tree Bank训练的,而中文是使用Chinese Tree Bank训练的(这些语料库是收费的,因此Stanford Parser值提供训练好的模型,无法提供训练数据)。对于中文来说,有PCFG和Factored两种模型,然后训练语料库包含Xinhua(新华日报)和混合的语料库。因此共有4个模型:xinhuaPCFG.ser.gz、xinhuaFactored.ser.gz、chinesePCFG.ser.gz和chineseFactored.ser.gz。对于大陆的用户来说,推荐使用xinhuaFactored.ser.gz。但CoreNLP中默认使用edu/stanford/nlp/models/srparser/chineseSR.ser.gz,这是速度更快的SR-Parser。更多关于Parser的问题,可以参考这里。
下面的代码演示了parser用法:
public class ConstituentExample {

  public static void main(String[] args) {
    // set up pipeline properties
    Properties props = new Properties();
    props.setProperty("annotators", "tokenize,ssplit,pos,lemma,ner,parse");

    // set up Stanford CoreNLP pipeline
    StanfordCoreNLP pipeline = new StanfordCoreNLP(props);
    // build annotation for a review
    Annotation annotation = new Annotation("The small red car turned very quickly around the corner.");
    // annotate
    pipeline.annotate(annotation);
    // get tree
    Tree tree = annotation.get(CoreAnnotations.SentencesAnnotation.class).get(0)
        .get(TreeCoreAnnotations.TreeAnnotation.class);
    System.out.println(tree);
    Set<Constituent> treeConstituents = tree.constituents(new LabeledScoredConstituentFactory());
    for (Constituent constituent : treeConstituents) {
      if (constituent.label() != null
          && (constituent.label().toString().equals("VP") ||
		constituent.label().toString().equals("NP"))) {
        System.err.println("found constituent: " + constituent.toString());
        System.err.println(tree.getLeaves().subList(constituent.start(), constituent.end() + 1));
      }
    }
  }
}
代码首先在annotators里加入parse,然后使用pipeline进行处理。
然后使用key TreeCoreAnnotations.TreeAnnotation.class从annotation里取出parse的结果,这是一个Tree对象,打印出来如下:
(ROOT (S (NP (DT The) (JJ small) (JJ red) (NN car)) (VP (VBD turned) (ADVP (RB very) (RB quickly)) (PP (IN around) (NP (DT the) (NN corner)))) (. .)))
这种表示很难读,把它画出来如下图所示。
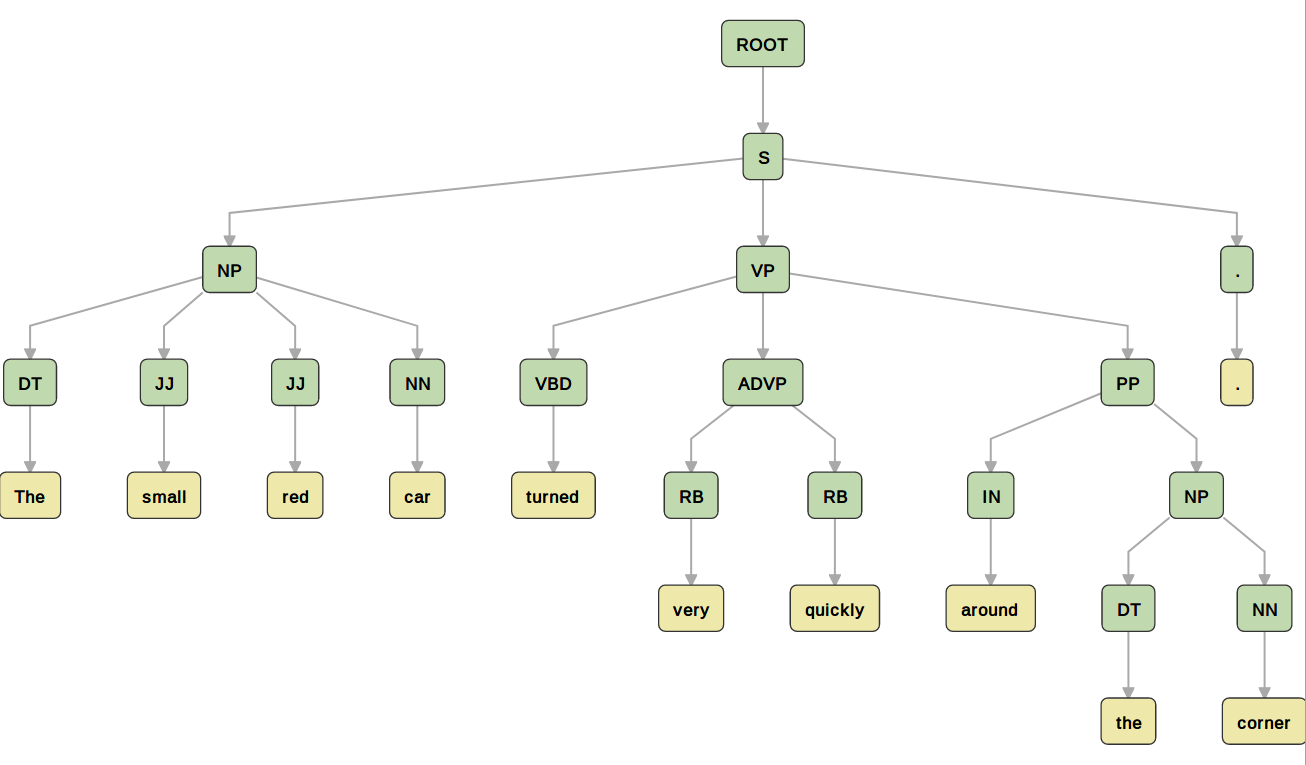 图:Parsing结果
接着使用”Set
for (Constituent constituent : treeConstituents) {
  if (constituent.label() != null
     && (constituent.label().toString().equals("VP") || constituent.label().toString().equals("NP"))) {
    System.err.println("found constituent: " + constituent.toString());
    System.err.println(tree.getLeaves().subList(constituent.start(), constituent.end() + 1));
  }
}
一个Constituent代表一个成分,这是一棵树,但是我们想拿到所有叶子节点,constituent.start()表示开始token的下标,constituent.end()表示最后一个token的下标(这是包含的,和subList等方法不一样,所以后面的subList要加一)。
因此上面代码的结果是,读者可以对照上面的Parsing树:
found constituent: NP(0,3)
[The, small, red, car]
found constituent: NP(8,9)
[the, corner]
found constituent: VP(4,9)
[turned, very, quickly, around, the, corner]
depparse
它对应的是DependencyParseAnnotator,用于实现依存句法分析(Dependency Parsing)。目前默认使用神经网络的模型,基于Shift-Reduce(SR-Parsing)。下图是依存句法分析的示例。
 图:依存句法分析示例
coref
coref用于实现指代消解。在一个文本中的可能有多个实体表示的是物理实际中的相同实体,我们需要找出这种关系来。
比如文本”Barack Obama was born in Hawaii. He is the president. Obama was elected in 2008.”,实体Barack Obama和He以及Obama都是指代通一个人。
CoreNLP包含3种算法:
- Deterministic 基于规则的确定的算法,支持英文和中文。
- Statistical 基于统计的方法,只支持英文,而且依赖依存句法分析(depparse)。
- Neural 基于深度学习的算法,支持英文和中文。
不同的模型的速度和F1得分如下表所示。
| 系统 | 语言 | 预处理时间 | 指代消解算法实际 | 总时间 | F1得分 |
|---|---|---|---|---|---|
| Deterministic | English | 3.87s | 0.11s | 3.98s | 49.5 |
| Statistical | English | 0.48s | 1.23s | 1.71s | 56.2 |
| Neural | English | 3.22s | 4.96s | 8.18s | 60.0 |
| Deterministic | Chinese | 0.39s | 0.16s | 0.55s | 47.5 |
| Neural | Chinese | 0.42s | 7.02s | 7.44s | 53.9 |
代码示例如下:
public class CorefExample {
  public static void main(String[] args) throws Exception {
    Annotation document = new Annotation(
        "Barack Obama was born in Hawaii.  He is the president. Obama was elected in 2008.");
    Properties props = new Properties();
    props.setProperty("annotators", "tokenize,ssplit,pos,lemma,ner,parse,coref");
    StanfordCoreNLP pipeline = new StanfordCoreNLP(props);
    pipeline.annotate(document);
    System.out.println("---");
    System.out.println("coref chains");
    for (CorefChain cc : document.get(CorefCoreAnnotations.CorefChainAnnotation.class).values()) {
      System.out.println("\t" + cc);
    }
    for (CoreMap sentence : document.get(CoreAnnotations.SentencesAnnotation.class)) {
      System.out.println("---");
      System.out.println("mentions");
      for (Mention m : sentence.get(CorefCoreAnnotations.CorefMentionsAnnotation.class)) {
        System.out.println("\t" + m);
      }
    }
  }
}
程序的输出是:
---
coref chains
	CHAIN3-["Barack Obama" in sentence 1, "He" in sentence 2, "Obama" in sentence 3]
---
mentions
	Barack Obama
	Hawaii
---
mentions
	the president
	He
---
mentions
	Obama
	2008
我们首先可以拿到CorefChain,它包括mentions和mentionMap。前者是一个List,每一个元素是CorefChain.CorefMention类的对象,这个对象主要有如下字段:
-
sentNum 句子id,从1开始,比如上的例子”Barack Obama”是一个CorefMention对象,它的sentNum是1。
-
startIndex Token的开始下标,也是从1开始,因此上面”Barack Obama”的例子里值为1。
-
endIndex Token的结束下标(不包含),”Barack Obama”的例子为3。
-
mentionType 枚举类型Dictionaries.MentionType。包括PROPER(实体)、NOMINAL (普通名词)、PRONOMINAL(代词)和LIST(集合)。这里的”Barack Obama”是PROPER,表示这是一个实体(人名)。
-
gender 枚举类型Dictionaries.Gender。包括FEMALE(女性)、MALE(男性)、NEUTRAL(中性)和UNKNOWN(未知)。”Barack Obama”的例子为MALE。
-
number 枚举类型Dictionaries.Number。包括PLURAL(复数)、SINGULAR(单数)和UNKNOWN(未知)。”Barack Obama”的例子为SINGULAR。
对于前面的例子,List中共有3个CorefMention:
"Barack Obama" in sentence 1
"He" in sentence 2
"Obama" in sentence 3
这三个Mention中有一个”最好”的,这里是”Barack Obama”。如果调用getRepresentativeMention()方法就可以得到这个最具代表性的Mention。
mentionMap的key是IntPair,第一个整数表示句子id(下标从1开始),第二个整数表示这个句子中Mention最核心(head)的词。比如:
1 2=["Barack Obama" in sentence 1]
2 1=["He" in sentence 2]
3 1=["Obama" in sentence 3]
表示第一个句子的Mention的核心词是Obama(第二个词);第二个句子和第三个句子的Mention的核心词是第一个词。
此外我们也可以遍历句子中的每一个Mention(注意:每一个实体都是一个Mention,比如Hawaii,但是不见得有其它的词指代它)。
sentiment
对应SentimentAnnotator,用于情感分类,目前只支持英文。详细算法请参考这里,读者也可以阅读下面的评论。我们这里只介绍其用法,这里的情感分为5类:
"Very negative" = 0
"Negative" = 1
"Neutral" = 2
"Positive" = 3
"Very positive" = 4
我们首先需要初始化Pipeline,代码在SentimentAnalyzer的init()方法里:
	public void initialize() {
		Properties properties = new Properties();
		properties.setProperty("annotators", "tokenize, ssplit, parse, sentiment");
		pipeline = new StanfordCoreNLP(properties);
	}
调用pipeline的annotate之后,我们可以得到每个句子CoreMap sentence,然后使用下面的代码得到情感分类的结果:
Tree tree = sentence.get(SentimentCoreAnnotations.SentimentAnnotatedTree.class);
SimpleMatrix simpleMatrix = RNNCoreAnnotations.getPredictions(tree);

classification.setVeryNegative((double) Math.round(simpleMatrix.get(0) * 100d));
classification.setNegative((double) Math.round(simpleMatrix.get(1) * 100d));
classification.setNeutral((double) Math.round(simpleMatrix.get(2) * 100d));
classification.setPositive((double) Math.round(simpleMatrix.get(3) * 100d));
classification.setVeryPositive((double) Math.round(simpleMatrix.get(4) * 100d));

String setimentType = sentence.get(SentimentCoreAnnotations.SentimentClass.class);
sentimentResult.setSentimentType(setimentType);
sentimentResult.setSentimentClass(classification);
sentimentResult.setSentimentScore(RNNCoreAnnotations.getPredictedClass(tree));
首先用SentimentCoreAnnotations.SentimentAnnotatedTree.class得到Tree对象,然后用RNNCoreAnnotations.getPredictions(tree)得到SimpleMatrix。simpleMatrix.get(0)得到第一个分类(Very Negative)的概率。
完整代码请参考这里。
CoreNLP Server
前面我们介绍了怎么使用Java代码使用CoreNLP,但是如果我们使用其它语言呢?另外我们有时希望提供一个Web的Service,它在后台一直运行并且提供服务。CoreNLP Server就是用于这个目的。
命令行用法
可以使用如下的命令启动CoreNLP Server:
lili@lili-Precision-7720:~/soft/stanford-corenlp-full-2018-10-05$ java -mx4g -cp "*" \
       edu.stanford.nlp.pipeline.StanfordCoreNLPServer -port 9000 -timeout 15000
[main] INFO CoreNLP - --- StanfordCoreNLPServer#main() called ---
[main] INFO CoreNLP - setting default constituency parser
[main] INFO CoreNLP - warning: cannot find edu/stanford/nlp/models/srparser/englishSR.ser.gz
[main] INFO CoreNLP - using: edu/stanford/nlp/models/lexparser/englishPCFG.ser.gz instead
[main] INFO CoreNLP - to use shift reduce parser download English models jar from:
[main] INFO CoreNLP - http://stanfordnlp.github.io/CoreNLP/download.html
[main] INFO CoreNLP -     Threads: 8
[main] INFO CoreNLP - Starting server...
[main] INFO CoreNLP - StanfordCoreNLPServer listening at /0:0:0:0:0:0:0:0:9000
我们看到服务启动后监听在9000端口。上面启动的是默认的英文的服务,如果像使用中文服务,可以这样:
java -Xmx4g -cp "*" edu.stanford.nlp.pipeline.StanfordCoreNLPServer \
  -serverProperties StanfordCoreNLP-chinese.properties -port 9000 -timeout 15000
用浏览器访问http://localhost:9000/,我们可以看到如下图的界面。
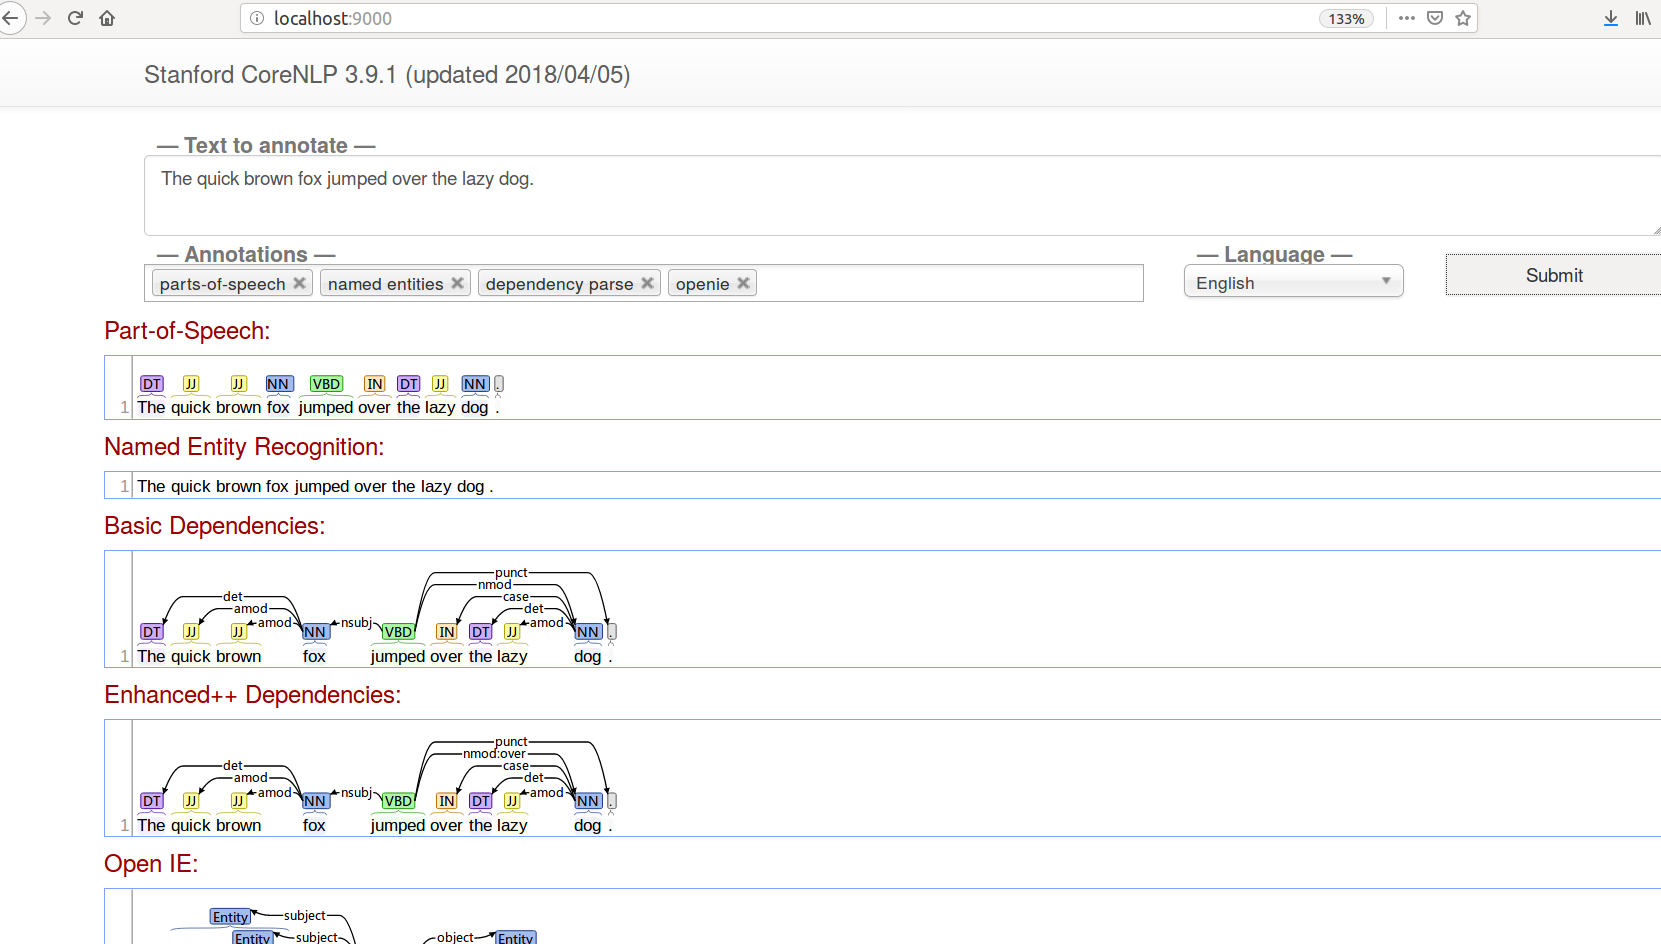 图:CoreNLP Server的UI
这个界面非常简单漂亮,我们可以选择需要使用的annotations,在文本框填入要分析的文本,点击提交就可以输出结果。
上面的界面虽然漂亮,但是我们更希望它输出Json,这样程序更容易处理,我们可以使用如下命令:
wget --post-data 'The quick brown fox jumped over the lazy dog.' \
'localhost:9000/?properties={"annotators":"tokenize,ssplit,pos","outputFormat":"json"}' -O -
它会输出一个json:
  "sentences": [
    {
      "index": 0,
      "tokens": [
        {
          "index": 1,
          "word": "The",
          "originalText": "The",
          "characterOffsetBegin": 0,
          "characterOffsetEnd": 3,
          "pos": "DT",
          "before": "",
          "after": " "
        },
        {
          "index": 2,
          "word": "quick",
          "originalText": "quick",
          "characterOffsetBegin": 4,
          "characterOffsetEnd": 9,
          "pos": "JJ",
          "before": " ",
          "after": " "
        },
        {
          "index": 3,
          "word": "brown",
          "originalText": "brown",
          "characterOffsetBegin": 10,
          "characterOffsetEnd": 15,
          "pos": "JJ",
          "before": " ",
          "after": " "
        },
        {
          "index": 4,
          "word": "fox",
          "originalText": "fox",
          "characterOffsetBegin": 16,
          "characterOffsetEnd": 19,
          "pos": "NN",
          "before": " ",
          "after": " "
        },
        {
          "index": 5,
          "word": "jumped",
          "originalText": "jumped",
          "characterOffsetBegin": 20,
          "characterOffsetEnd": 26,
          "pos": "VBD",
          "before": " ",
          "after": " "
        },
        {
          "index": 6,
          "word": "over",
          "originalText": "over",
          "characterOffsetBegin": 27,
          "characterOffsetEnd": 31,
          "pos": "IN",
          "before": " ",
          "after": " "
        },
        {
          "index": 7,
          "word": "the",
          "originalText": "the",
          "characterOffsetBegin": 32,
          "characterOffsetEnd": 35,
          "pos": "DT",
          "before": " ",
          "after": " "
        },
        {
          "index": 8,
          "word": "lazy",
          "originalText": "lazy",
          "characterOffsetBegin": 36,
          "characterOffsetEnd": 40,
          "pos": "JJ",
          "before": " ",
          "after": " "
        },
        {
          "index": 9,
          "word": "dog",
          "originalText": "dog",
          "characterOffsetBegin": 41,
          "characterOffsetEnd": 44,
          "pos": "NN",
          "before": " ",
          "after": ""
        },
        {
          "index": 10,
          "word": ".",
          "originalText": ".",
          "characterOffsetBegin": 44,
          "characterOffsetEnd": 45,
          "pos": ".",
          "before": "",
          "after": ""
        }
      ]
    }
  ]
}
Java Client
我们当然可以使用各种Http的工具发送HTTP请求然后Parse返回的Json,但是我们希望把Json变成Java对象,从而便于使用。CoreNLP提供了一个Java的Client,下面是示例代码:
Properties props = new Properties();
props.setProperty("annotators", "tokenize, ssplit, pos, lemma, ner, parse, dcoref");
StanfordCoreNLPClient pipeline = new StanfordCoreNLPClient(props, "http://localhost", 9000, 2);
// read some text in the text variable
String text = ... // Add your text here!
// create an empty Annotation just with the given text
Annotation document = new Annotation(text);
// run all Annotators on this text
pipeline.annotate(document);
构造StanfordCoreNLPClient和构造StanfordCoreNLP很像,只是多了三个参数,分别表示服务器的host、port以及线程数。构造好了之后的用法就完全一样了。
Python Client
除了Java,我们这里只介绍Python,其它更多语言请参考这里。有很多Python的Client,我们这里使用py-corenlp。我们可以使用pip安装:
pip install pycorenlp
测试的代码如下:
from pprint import pprint
from pycorenlp.corenlp import StanfordCoreNLP
host = "http://localhost"
port = "9000"
nlp = StanfordCoreNLP(host + ":" + port)
text = "Joshua Brown, 40, was killed in Florida in May when his Tesla failed to " \
       "differentiate between the side of a turning truck and the sky while " \
       "operating in autopilot mode."
output = nlp.annotate(
    text,
    properties={
        "outputFormat": "json",
        "annotators": "depparse,ner,entitymentions,sentiment"
    }
)
pprint(output)
一个同时支持中文和英文的Server
如果我们只使用中文或者英文,那么可以使用StanfordCoreNLPClient。但是如果我们想启动一个服务同时支持两种(多种)语言呢?我们可以简单的构建一个项目,同时把下面的两个依赖加入pom.xml:
		<dependency>
			<groupId>edu.stanford.nlp</groupId>
			<artifactId>stanford-corenlp</artifactId>
			<version>3.9.2</version>
			<classifier>models</classifier>
		</dependency>
		<dependency>
			<groupId>edu.stanford.nlp</groupId>
			<artifactId>stanford-corenlp</artifactId>
			<version>3.9.2</version>
			<classifier>models-chinese</classifier>
		</dependency>
然后启动服务ServerDemo:
package com.fancyerii.blog.stanfordnlp;
import java.io.IOException;

import edu.stanford.nlp.pipeline.StanfordCoreNLPServer;
public class ServerDemo {

	public static void main(String[] args) throws IOException {
		StanfordCoreNLPServer.main(args);
	}

}
用”mvn compile assembly:single”打包,然后用如下命令启动服务:
java -cp "target/*" -Xmx8g com.fancyerii.blog.stanfordnlp.ServerDemo \
     -preload tokenize,ssplit,pos,lemma,ner,parse,depparse \
     -status_port 9000 -port 9000 -timeout 15000
我们需要比较大的内存,这里设置了8GB内存。
我们可以使用前面的StanfordCoreNLPClient来处理英文,但是没办法使用它处理中文。因此作者对StanfordCoreNLPClient进行了简单的修改实现了MultiLangsStanfordCoreNLPClient.java。它的用法为:
// creates a StanfordCoreNLP object with POS tagging, lemmatization,
// NER, parsing, and coreference resolution
Properties props = new Properties();

props.setProperty("annotators", "tokenize,ssplit,pos,ner,depparse,openie");
MultiLangsStanfordCoreNLPClient pipeline = new MultiLangsStanfordCoreNLPClient(props,
			"http://localhost", 9000, 2, null, null, "zh");

// read some text in the text variable
String text = "今天天气很好。";
// create an empty Annotation just with the given text
Annotation document = new Annotation(text);
// run all Annotators on this text
pipeline.annotate(document);

CoreMap firstSentence = document.get(CoreAnnotations.SentencesAnnotation.class).get(0);
// this for loop will print out all of the tokens and the character offset info
for (CoreLabel token : firstSentence.get(CoreAnnotations.TokensAnnotation.class)) {
  System.out.println(token.word() + "\t" + token.beginPosition() + "\t" + token.endPosition());
}
- 显示Disqus评论(需要科学上网)