本文主要介绍论文Adapt or Get Left Behind: Domain Adaptation through BERT Language Model Finetuning for Aspect-Target Sentiment Classification及其代码实现。
目录
论文解读
Introduction
最早的情感分析只是判断文本(可以是一句话或者一段长文本)的情感倾向,但是很多实际应用需要更细粒度的分析,这就出现了Aspect Based Sentiment Analysis (ABSA)任务,不了解的读者可以先参考情感分析简介。ABSA任务有两种方法:ACD+ACSC和ATE+ATSC。
ACD是Aspect Category Detection的缩写,ACSC是Aspect Category Sentiment Classifica- tion的缩写。ACD是一个多标签(multi-label)分类问题,一个句子可以同时说多个aspect category。以句子”I love their dumplings”为例,ACD会把它分类为food这个category,而ACSC会把这个aspect的情感分类为正面。
ATE是Aspect Target Extraction的缩写,而ATSC是Aspect Target Sentiment Classification的缩写。还是以”I love their dumplings”为例,ATE抽取的是dumplings,ATSC会把对于dumplings的情感分类为正面。
本文解决的就是ATSC的问题,也就是给定一个句子和Aspect Target(比如dumplings),判断它的情感分类。注意:一个句子可能包括多个Aspect Target,比如”这个酒店的位置很好但是服务一般”,则它有”位置”和”服务”两个Aspect Target,它们的情感分类分别是正面和负面。对于这个句子,会进行两次预测,首先的输入是”这个酒店的位置很好但是服务一般”+”位置”,输出应该是正面;接着输入是”这个酒店的位置很好但是服务一般”+”服务”,输出是负面。
方法
本文的方法非常简单,就是使用BERT来进行分类,对BERT不熟悉的读者可以先参考BERT课程。因为有句子和Target两个输入,所以在fine-tuning是会把它们拼接起来。假设句子是s,Target是t,则BERT在fine-tuning时的输入是”[CLS] s [SEP] t [SEP]”。另外本文能取得很好结果的原因就是使用了大量领域数据来pretraining BERT,因为Wiki等语料库和评论的差别还是比较大的。比如在wiki里,”The touchscreen is an [MASK] device”,[MASK]很可能是”input”这样的词,而在评论里,[MASK]更可能是”amazing”这样的词。
论文使用了Yelp的酒店评论数据和Amazon的电子产品的评论数据来对BERT模型进行pretraining(初始为Google模型),在酒店的ATSC任务上取得里很好的成绩,下图是实验结果。
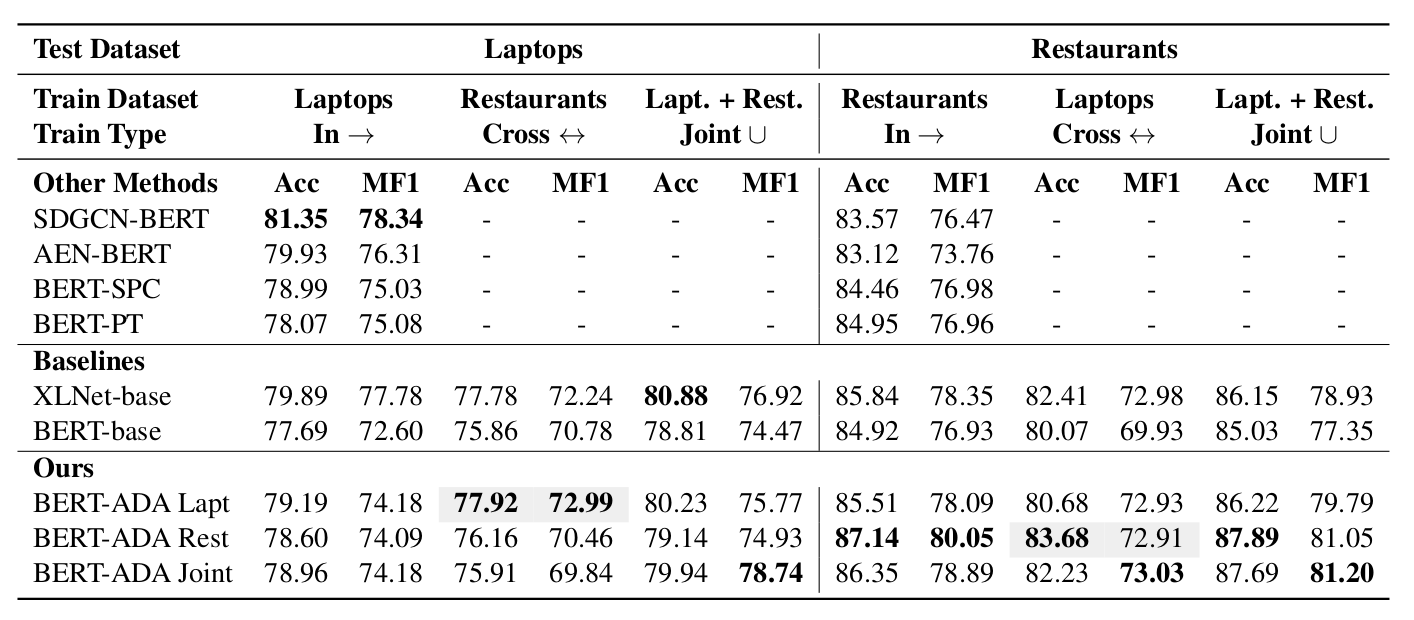 图:实验结果
这篇文章的方法在酒店的数据集上效果很好,但是在笔记本电脑上并没有取得最好的结果。
代码
运行代码
下载代码
git clone https://github.com/deepopinion/domain-adapted-atsc.git
安装
python -m venv venv
source venv/bin/activate
pip install -r requirements.txt
python -m spacy download en_core_web_sm
mkdir -p data/raw/semeval2014  # creates directories for data
mkdir -p data/transformed
mkdir -p data/models
为了进行fine-tuning,需要安装pytorch、pytorch-transformers和apex。我们首先安装pytorch和pytorch-transformer:
pip install scipy sckit-learn
pip install https://download.pytorch.org/whl/cu100/torch-1.1.0-cp36-cp36m-linux_x86_64.whl
pip install pytorch-transformers tensorboardX
注意:上面安装的是pytorch-1.1.0的GPU版本,它需要CUDA-10.0。
接着需要安装apex:
cd ..
git clone https://github.com/NVIDIA/apex
cd apex
pip install -v --no-cache-dir --global-option="--cpp_ext" --global-option="--cuda_ext" ./
作者执行最后的pip install时碰到了一些小困难。它会提示nvcc的版本和编译pytorch的不一致(因为pytorch是用pip而不是从源代码安装的),因此需要修改setup.py去掉下面的检查的代码:
check_cuda_torch_binary_vs_bare_metal(torch.utils.cpp_extension.CUDA_HOME)
去掉之后就可以用最后pip install 安装apex了。
准备fine-tuning BERT语言模型的数据
这个步骤是准备fine-tuning(其实是在BERT基础模型的基础上继续pretraining)语言模型的数据,作者也提供了他fine-tuning之后的模型,如果读者不想自己fine-tuning语言模型可以跳过这一步。
作者用来fine-tuning laptop任务的数据来自Amazon的电子产品的数据,参考这个链接,大家可以发邮件给julian.mcauley@gmail.com来申请这个数据集。mcauley的邮件会给出下载的链接,读者也需要下载的是reviews_Electronics.json.gz和meta_Electronics.json.gz两个文件,注意别下载错了。这两个文件分别为1.7GB和178MB。
而fine-tuning restaurant的数据集来自yelp,大家可以点击这里下载,下载得到一个yelp_dataset.tar.gz。解压它可以得到一个review.json文件,这个文件的大小是5.0GB。
把这些文件都放到data/raw下,类似:
lili@lili-Precision-7720:~/codes/domain-adapted-atsc/data/raw$ ls
meta_Electronics.json.gz  review.json  reviews_Electronics.json.gz
数据预处理:
python prepare_laptop_reviews.py
python prepare_restaurant_reviews.py
python prepare_restaurant_reviews.py --large  # takes some time to finish
处理后在data/transformed/下会得到laptop_corpus_1019917.txt这样的文件,这是BERT pretraining需要的数据格式,我们可以看几行:
$ head laptop_corpus_1019917.txt

This product has proven to be a communication breakthrough for my brother who has gone deaf in his elder years.
He is not computer literate and cannot type.
However, he quickly picked up on how to use this machine which plugs into the phone line.
I love it!
It has ended our one way conversations for he can now read whatever I send him and either respond by email or by calling (I can hear him just fine).
I think this is a very useful product!

I gave this product 1 star based on problems I have encountered with one I bought for my in-laws.
(See previous review).
文档之间用一个空行分割开,每行表示一个句子,这是BERT需要的。
因为论文还把两个数据集混合在一起训练,所以还有一个步骤是把两个数据cat到一起:
cd data/transformed
cat laptop_corpus_1011255.txt restaurant_corpus_1000004.txt > mixed_corpus.txt
下载SemEval 2014数据
请读者去这里所有SemEval 2014的数据,下载后类似这样:
lili@lili-Precision-7720:~/codes/domain-adapted-atsc/data/raw/semeval2014$ tree
.
├── SemEval-2014 ABSA Test Data - Gold Annotations
│   ├── ABSA_Gold_TestData
│   │   ├── Laptops_Test_Gold.xml
│   │   └── Restaurants_Test_Gold.xml
│   └── Laptops_Test_Gold.xml
└── SemEval-2014 ABSA Train Data v2.0 & Annotation Guidelines
    ├── Laptop_Train_v2.xml
    └── Restaurants_Train_v2.xml
请参考上面的目录结构放置解压后的文件(如果是Windows的话可能文件名不能用&,那么需要重命名,代码也需要修改)。
我们看一下SemEval-2014 ABSA Train Data v2.0 & Annotation Guidelines/Restaurants_Train_v2.xml这个文件:
    1 <?xml version="1.0" encoding="UTF-8" standalone="yes"?>
    2 <sentences>
    3     <sentence id="3121">
    4         <text>But the staff was so horrible to us.</text>
    5         <aspectTerms>
    6             <aspectTerm term="staff" polarity="negative" from="8" to="13"/>
    7         </aspectTerms>
    8         <aspectCategories>
    9             <aspectCategory category="service" polarity="negative"/>
   10         </aspectCategories>
   11     </sentence>
   12     <sentence id="2777">
   13         <text>To be completely fair, the only redeeming factor was the food, which was above average, but co      uldn't make up for all the other deficiencies of Teodora.</text>
   14         <aspectTerms>
   15             <aspectTerm term="food" polarity="positive" from="57" to="61"/>
   16         </aspectTerms>
   17         <aspectCategories>
   18             <aspectCategory category="food" polarity="positive"/>
   19             <aspectCategory category="anecdotes/miscellaneous" polarity="negative"/>
   20         </aspectCategories>
   21     </sentence>
对于ATSC这个任务,输入是”But the staff was so horrible to us.”和”staff”,输出是negative这个分类。
因为SemEval 2014分类包括冲突(conflict),作者把冲突的数据去掉了。下面的脚本就是处理掉这些数据,首先是laptop的数据:
# laptops

# laptops without conflict label
python prepare_semeval_datasets.py \
--files "data/raw/semeval2014/SemEval-2014 ABSA Train Data v2.0 & Annotation Guidelines/Laptop_Train_v2.xml" \
--output_dir data/transformed/laptops_noconfl \
--istrain \
--noconfl

python prepare_semeval_datasets.py \
--files "data/raw/semeval2014/SemEval-2014 ABSA Test Data - Gold Annotations/ABSA_Gold_TestData/Laptops_Test_Gold.xml" \
--output_dir data/transformed/laptops_noconfl \
--noconfl
然后是restaurant:
# restaurants without conflict label
python prepare_semeval_datasets.py \
--files "data/raw/semeval2014/SemEval-2014 ABSA Train Data v2.0 & Annotation Guidelines/Restaurants_Train_v2.xml" \
--output_dir data/transformed/restaurants_noconfl \
--istrain \
--noconfl

python prepare_semeval_datasets.py \
--files "data/raw/semeval2014/SemEval-2014 ABSA Test Data - Gold Annotations/ABSA_Gold_TestData/Restaurants_Test_Gold.xml" \
--output_dir data/transformed/restaurants_noconfl \
--noconfl
最后是混合的训练数据:
# mixed without conflict label
python prepare_semeval_datasets.py \
--files "data/raw/semeval2014/SemEval-2014 ABSA Train Data v2.0 & Annotation Guidelines/Restaurants_Train_v2.xml" \
"data/raw/semeval2014/SemEval-2014 ABSA Train Data v2.0 & Annotation Guidelines/Laptop_Train_v2.xml" \
--output_dir data/transformed/mixed_noconfl \
--istrain --noconfl

python prepare_semeval_datasets.py \
--files "data/raw/semeval2014/SemEval-2014 ABSA Test Data - Gold Annotations/ABSA_Gold_TestData/Restaurants_Test_Gold.xml" \
"data/raw/semeval2014/SemEval-2014 ABSA Test Data - Gold Annotations/ABSA_Gold_TestData/Laptops_Test_Gold.xml" \
--output_dir data/transformed/mixed_noconfl --noconfl
使用作者pretraining好的BERT语言模型来fine-tuning ATSC restaurant任务
我们这里只尝试restaurant数据集,首先在这里下载作者pretraining好的BERT模型。下载后放到data/models下:
lili@lili-Precision-7720:~/codes/domain-adapted-atsc/data/models$ tree restaurants_10mio_ep3/
restaurants_10mio_ep3/
├── added_tokens.json
├── config.json
├── pytorch_model.bin
├── special_tokens_map.json
└── vocab.txt
然后基于这个模型进行监督的fine-tuning:
cd finetuning_and_classification

python run_glue.py \
--model_type bert \
--model_name_or_path ../data/models/restaurants_10mio_ep3 \
--do_train --evaluate_during_training --do_eval \
--logging_steps 100 --save_steps 1200 --task_name=semeval2014-atsc \
--seed 42 --do_lower_case \
--data_dir=../data/transformed/restaurants_noconfl \
--output_dir=../data/models/semeval2014-atsc-bert-ada-restaurants-restaurants \
--max_seq_length=128 --learning_rate 3e-5 --per_gpu_eval_batch_size=8 --per_gpu_train_batch_size=8 \
--gradient_accumulation_steps=1 --max_steps=800 --overwrite_output_dir --overwrite_cache --warmup_steps=120 --fp16
请根据GPU的内存修改per_gpu_eval_batch_size和per_gpu_train_batch_size两个参数,我这里使用是8。
最终作者得到的结果为:
10/21/2019 09:41:51 - INFO - __main__ -   ***** Eval results  *****
10/21/2019 09:41:51 - INFO - __main__ -     acc = 0.8723214285714286
10/21/2019 09:41:51 - INFO - __main__ -     f1_macro = 0.7945154951637271
基本和论文里的87%的准确率以及80%的F1得分是差不多的。
自己使用Yelp来pretrainng语言模型
因为训练1000万的语料太费时间,我这里只使用里100万的数据进行了3个epoch。
首先需要生成BERT需要的训练数据,这可以使用下面的脚本:
python pregenerate_training_data.py \
--train_corpus \
../data/transformed/restaurant_corpus_1000000.txt \
--bert_model \
bert-base-uncased \
--do_lower_case \
--output_dir \
dev_corpus_prepared/ \
--epochs_to_generate \
3 \
--max_seq_len \
256
接着进行pretraining:
python finetune_on_pregenerated.py \
--pregenerated_data dev_corpus_prepared/ \
--bert_model bert-base-uncased \
--do_lower_case \
--output_dir dev_corpus_finetuned/ \
--epochs 2 \
--train_batch_size 4 \
然后用自己pretraining的模型再进行fine-tuning:
python run_glue.py \
--model_type bert \
--model_name_or_path dev_corpus_finetuned/ \
--do_train --evaluate_during_training --do_eval \
--logging_steps 100 --save_steps 1200 --task_name=semeval2014-atsc \
--seed 42 --do_lower_case \
--data_dir=../data/transformed/restaurants_noconfl \
--output_dir=../data/models/semeval2014-atsc-bert-ada-restaurants-restaurants \
--max_seq_length=128 --learning_rate 3e-5 --per_gpu_eval_batch_size=8 --per_gpu_train_batch_size=8 \
--gradient_accumulation_steps=1 --max_steps=800 --overwrite_output_dir --overwrite_cache --warmup_steps=120 --fp16
这个和前面的唯一区别就是--model_name_or_path使用了我们自己的模型。因为没有使用大量的数据,最终的效果比作者pretraining的要差一些。从这里也能看出,如果读者要对自己领域的数据进行情感分析的话,最好还是找大量未标注的语料库pretraining之后在用监督数据进行fine-tuning效果会更好。
代码分析
未完待续
- 显示Disqus评论(需要科学上网)