本文介绍一个基于RNN的语音唤醒引擎。语音唤醒引擎也就热词(Hot-Word)识别引擎,这是智能语音硬件上的一个基础功能。为了节约能量,语音识别引擎平时是关闭的,为了开启语音识别引擎,我们会对智能设备说一个特殊的词,比如对亚马逊的Echo说”Hey Alexa”,这个时候语音识别引擎就会开启。这个语音唤醒引擎需要很高的识别率(召回率)和很低的误触发率,同时还需要省电。有的时候甚至需要把这个模块做的硬件上从而降低能耗。更多文章请点击深度学习理论与实战:提高篇。
目录
简介
本文介绍mycroft-precise,这是一个开源的基于GRU的语音唤醒引擎。它的实现非常简单,比较适合学习。除此之外,比较流行的还有Snowboy和Porcupine,这两个都不是开源的(虽然都放在Github上)。前者只是提供了一个Web API,当然Client的代码是开源的,但是你要用它必须得联网,这就没有太大意义。而后者是闭源代码,只提供二进制的可执行代码。详细的比较参考这里。
安装
为了训练,需要从源代码安装。首先是获取代码:
git clone https://github.com/mycroftai/mycroft-precise
cd mycroft-precise
安装如下依赖:
- python3-pip
- libopenblas-dev
- python3-scipy
- cython
- libhdf5-dev
- python3-h5py
- portaudio19-dev
如果在Ubuntu下直接使用apt-get install安装,其它系统请自行想办法安装。
接着运行setup.sh安装:
./setup.sh
这个脚本会创建一个virtualenv环境.venv,位置在当前目录下。我们要使用的话需要激活它:
source .venv/bin/activate
录音
训练之前需要录制一些声音,我们可以使用precise-collect程序来录制声音:
$ precise-collect
Audio name (Ex. recording-##): hey-computer.##
ALSA lib pcm_dsnoop.c:638:(snd_pcm_dsnoop_open) unable to open slave
ALSA lib pcm_dmix.c:1099:(snd_pcm_dmix_open) unable to open slave
ALSA lib pcm_dmix.c:1099:(snd_pcm_dmix_open) unable to open slave
Press space to record (esc to exit)...
Recording...
Saved as hey-computer.00.wav
Press space to record (esc to exit)...
在运行precise-collect之后首先需要输入录音的名字,比如这里叫做”hey-computer”,然后按空格键开始录音,按ESC键结束录音,录音文件的名字为”hey-computer.00.wav”、”hey-computer.01.wav”,…。如果想停止录音就输入Ctrl+C。
我们通常至少需要录制十多个。然后我们再把这些录音分成训练集和测试集,目录结构如下所示:
hey-computer/
├── wake-word/
│   ├── hey-computer.00.wav
│   ├── hey-computer.01.wav
│   ├── hey-computer.02.wav
│   ├── hey-computer.03.wav
│   ├── hey-computer.04.wav
│   ├── hey-computer.05.wav
│   ├── hey-computer.06.wav
│   ├── hey-computer.07.wav
│   └── hey-computer.08.wav
├── not-wake-word/
└── test/
    ├── wake-word/
    │   ├── hey-computer.09.wav
    │   ├── hey-computer.10.wav
    │   ├── hey-computer.11.wav
    │   └── hey-computer.12.wav
    └── not-wake-word/
录音代码(*)
注:跳过本节不影响理解后面的内容。因为这个程序会设置tty,如果要在PyCharm等IDE调试的话需要开启Emulate Terminal,如下图所示。
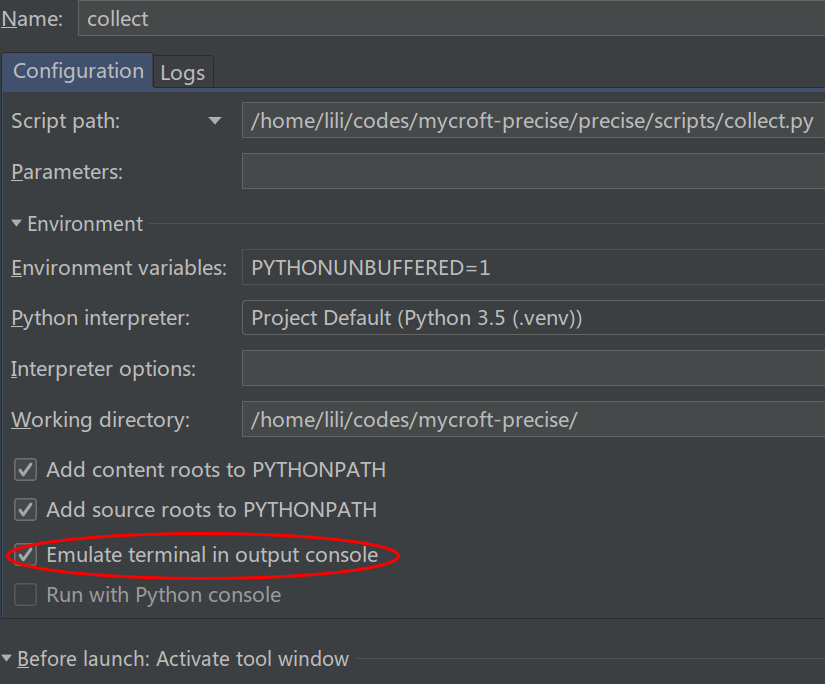 图:使用PyCharm调试的设置
录音程序的源代码在precise/scripts/collect.py,如果读者不知道程序对应的源代码在哪里的话,可以看setup.py:
    entry_points={
        'console_scripts': [
            'precise-add-noise=precise.scripts.add_noise:main',
            'precise-collect=precise.scripts.collect:main',
            'precise-convert=precise.scripts.convert:main',
            'precise-eval=precise.scripts.eval:main',
            'precise-listen=precise.scripts.listen:main',
            'precise-listen-pocketsphinx=precise.pocketsphinx.scripts.listen:main',
            'precise-engine=precise.scripts.engine:main',
            'precise-simulate=precise.scripts.simulate:main',
            'precise-test=precise.scripts.test:main',
            'precise-test-pocketsphinx=precise.pocketsphinx.scripts.test:main',
            'precise-train=precise.scripts.train:main',
            'precise-train-optimize=precise.scripts.train_optimize:main',
            'precise-train-sampled=precise.scripts.train_sampled:main',
            'precise-train-incremental=precise.scripts.train_incremental:main',
        ]
    },
这是setuptools指定入口的标准方式,我们可以看到precise-collect入口对于的是precise.scripts.collect的main函数。
collect.py的代码也很简单,就是使用pyaudio来录音,详细的文档可以参考这里。
这个程序麻烦的地方是开始录音后能够响应用户的ESC停止录音事件。略去参数处理,main函数的主要代码是:
    hide_input()

    p = pyaudio.PyAudio()

    while True:
        print('Press space to record (esc to exit)...')

        if not wait_to_continue():
            break

        print('Recording...')
        d = record_until_key(p, args)
        name = next_name(args.file_label)
        save_audio(name, d, args)
        print('Saved as ' + name)

    p.terminate()
hide_input()函数调用tty.setcbreak(stdin.fileno()),这个函数应该只对类支持POSIX termios设置的Unix系统(当然包括Ubuntu等主流的Linux系统/发行版)有效,它把tty设置为cbreak模式,关于cbreak和normal模式,可以参考这里。简单来说,cbreak模式会隐藏terminal的输出(可以用于避免输入密码时的回显)。这样我们在输入空格或者ESC的时候就不会显示出来(显得这个程序专业一些,其实并不影响使用)。
接着构造PyAudio对象,然后是一个死循环(只能Ctrl+C或者外部kill才能结束程序)。循环里首先使用wait_to_continue函数等待用户输入空格(如果输入ESC直接退出),用户输入空格后就开始使用record_until_key开始录音并且一直等待用户按ESC结束录音。这个函数的代码为:
def record_until_key(p, args):
    def should_return():
        return key_pressed() and stdin.read(1) == RECORD_KEY

    return record_until(p, should_return, args)
它调用record_until,这个函数一直录音,直到should_return函数返回True,也就是用户按了
def record_until(p, should_return, args):
    chunk_size = 1024
    stream = p.open(format=p.get_format_from_width(args.width), channels=args.channels,
                    rate=args.rate, input=True, frames_per_buffer=chunk_size)

    frames = []
    while not should_return():
        frames.append(stream.read(chunk_size))

    stream.stop_stream()
    stream.close()

    return b''.join(frames)
关键代码就是使用PyAudio对象p.open打开流,需要指定的参数如下:
- format 量化的字节数,默认是2,表示16位(2字节)的量化,语音通常使用16位的量化
- channels 通道数,默认是1,表示单通道的录音
- rate 采样率,默认16000,表示16KHz的采样,根据奈奎斯特-香农采样定律,8Khz对于语音来说是足够了(电话语音甚至用8KHz的采样率)
- input True,表示录音
- frames_per_buffer 每个buffer的frame数,这里是1024。
对于语音不了解的读者可以参考语音信号处理。
打开之后就是一个while循环,只有用户没有按下ESC键就不停的从流中读取数据放到frames里,如果用户用ESC结束录音,则先用stop_stream停止,然后close关闭并且返回所有的frames。
最后使用save_audio函数把它返回的二进制(字节)数组保存到wav文件:
def save_audio(name, data, args):
    wf = wave.open(name, 'wb')
    wf.setnchannels(args.channels)
    wf.setsampwidth(args.width)
    wf.setframerate(args.rate)
    wf.writeframes(data)
    wf.close()
初始化训练
$ precise-train -e 60 hey-computer.net hey-computer/
因为只有正样本,所以不需要(也不能)训练太多次,否则会过拟合。训练的模型保存在hey-computer.net里,另外还有一个hey-computer.epoch记录训练的epoch(60)数、hey-computer.net.params记录一些超参数:
{

    "n_mfcc":13,
    "sample_depth":2,
    "n_filt":20,
    "buffer_t":1.5,
    "sample_rate":16000,
    "window_t":0.1,
    "n_fft":512,
    "vectorizer":2,
    "use_delta":false,
    "hop_t":0.05

}
下面我们来阅读训练的代码,代码在precise.scripts.train。
create_model函数
其实核心代码非常简单,就是使用一个GRU模型来判断这个声音是否唤醒词。代码比较复杂的都是怎么提取特征,关于语音信号的特征提取,可以参考MFCC特征提取。
def create_model(model_name: Optional[str], params: ModelParams) -> 'Sequential':

    # 加载或者创建模型

    # 参数:
    #    model_name: 模型名
    #    params: 模型的参数

    # 返回:
    #    model: 返回的Keras模型

    if model_name and isfile(model_name):
        print('Loading from ' + model_name + '...')
        model = load_precise_model(model_name)
    else:
        from keras.layers.core import Dense
        from keras.layers.recurrent import GRU
        from keras.models import Sequential

        model = Sequential()
        model.add(GRU(
            params.recurrent_units, activation='linear',
            input_shape=(pr.n_features, pr.feature_size), dropout=params.dropout, name='net'
        ))
        model.add(Dense(1, activation='sigmoid'))

    load_keras()
    metrics = ['accuracy'] + params.extra_metrics * [false_pos, false_neg]
    set_loss_bias(params.loss_bias)
    model.compile('rmsprop', weighted_log_loss, metrics=(not params.skip_acc) * metrics)
    return model
如果模型文件已经存在了,那么直接加载到内存,否则创建新的模型。新的模型就是一个GRU,然后把GRU的最后一个时刻的输出接一个Dense(1),使用sigmoid输出0-1之间的值,表示识别成热词的概率。GRU的输入shape是(pr.n_features, pr.feature_size),n_features表示时间维度(也就是帧数,默认29),feature_size表示特征的维度(默认是13维MFCC特征),这里没有考虑batch,默认还有一个batch维度,因此最终训练师输入的shape是(batch, n_features, feature_size),输出是(batch, 1)。
然后使用compile编译模型,传入的损失函数是weighted_log_loss,这个函数代码为:
def weighted_log_loss(yt, yp) -> Any:

    from keras import backend as K

    pos_loss = -(0 + yt) * K.log(0 + yp + K.epsilon())
    neg_loss = -(1 - yt) * K.log(1 - yp + K.epsilon())

    return LOSS_BIAS * K.mean(neg_loss) + (1. - LOSS_BIAS) * K.mean(pos_loss)
这个损失函数看起来有一点点复杂,其实它和我们常见的交叉熵非常类似,只是加入了权重而已。我们先来看它的输入:yt表示真实的分类,yp表示预测为热词的概率,它们的shape都是(batch, 1)。我们先不考虑batch维度,那么可能的一个数据是yt=1和yp=0.8。表示这个训练数据是热词,而模型预测它是热词的概率是0.8。这显然是一个不错的预测,因此loss不能太大。而yt=1和yp=0.2,表示这是热词但是模型预测它为热词的概率很小,这显然没有前面预测的好,因此loss应比前面大。
因此当yt=1的时候,neg_loss是0(1-yt=0),所以最终的loss是-log(yp)。注意K.epsilon()的作用是加一个很小的数防止出现log0。也就是说yt是1的时候yp越大loss越小。
类似的,当yt=0的时候,pos_loss是0,所以最终的loss是-log(1-yp)。也就是说yt是0的时候yp越小越好。
如果把pos_loss和neg_loss直接加起来就是交叉熵损失函数。但是我们通常希望尽量避免误触发(把yt=0的识别成热词),因此我们给予neg_loss更大的惩罚(默认LOSS_BIAS=0.8)。这样模型更倾向于把一个词不识别成热词,而只有当它非常有把握的时候才识别热词。所以我们也可以LOSS_BIAS来调整模型识别的灵敏度,这个值越大,则越不灵敏,但是误触发也减少;反之则越灵敏但是误触发也越多。
加载数据
加载数据主要有load_data函数实现,它的主要代码就两行:
    def load_data(args: Any) -> Tuple[tuple, tuple]:
        data = TrainData.from_both(args.tags_file, args.tags_folder, args.folder)

        train, test = data.load(True, not args.no_validation)
第一行调用TrainData.from_both找到所有的训练数据(的路径),默认它期望如下的数据目录结构:
        {prefix}/
            wake-word/
                *.wav
            not-wake-word/
                *.wav
            test/
                wake-word/
                    *.wav
                not-wake-word/
                    *.wav
比如我们前面出传入的路径是hey-computer,那么{prefix}就是hey-computer。它会在这个目录下寻找wake-word子目录寻找wav文件作为正例(热词),而not-wake-word子目录作为负例。如果有test子目录的话它会把这个目录当作测试数据,再去test下寻找wake-word和not-wake-word。
data.load加载训练数据,它最终会调用到train_data.__load_files函数。最终把输入(wav)变成特征的代码是在vectorization.py:
def load_vector(name: str, vectorizer: Callable = None) -> np.ndarray:
    """Loads and caches a vector input from a wav or npy file"""
    vectorizer = vectorizer or (vectorize_delta if pr.use_delta else vectorize)

    save_name = name if name.endswith('.npy') else get_cache_file(name)

    if os.path.isfile(save_name):
        return np.load(save_name)

    os.makedirs(os.path.dirname(save_name), exist_ok=True)

    vec = vectorizer(load_audio(name))
    np.save(save_name, vec)
    return vec
参数vectorizer是真正实现特征提取的类,如果传入的vectorizer是None的话(默认就是None),则根据use_delta是否为True(默认False)来采样vectorize_delta或者vectorize。默认情况下use_delta是False,因此使用vectorize这个Callable来实现特征提取。
后面的代码判断是否文件是npy文件,如果是npy文件,则直接从磁盘读取,这样避免重复提取特征(默认是.cache目录下)。如果缓存不存在,那么执行vec = vectorizer(load_audio(name)),最后把vec保存在cache目录下以便后面重复使用。
load_audio
加载wav文件,非常简单,核心代码为:
def load_audio(file: Any) -> np.ndarray:
    import wavio
    try:
        wav = wavio.read(file)
    except EOFError:
        wav = wavio.Wav(np.array([[]], dtype=np.int16), 16000, 2)
    if wav.data.dtype != np.int16:
        raise InvalidAudio('Unsupported data type: ' + str(wav.data.dtype))
    if wav.rate != pr.sample_rate:
        raise InvalidAudio('Unsupported sample rate: ' + str(wav.rate))

    data = np.squeeze(wav.data)
    return data.astype(np.float32) / float(np.iinfo(data.dtype).max)
这个函数首先使用wavio.read读取wav文件,这个wav文件头应该包含采样率等信息。这个函数最终使用标准库里是wave模块,因此它有wave模块相同的局限——只能读取不压缩的格式而且输入是整数。如果读取失败会使用wavio.Wav函数构造一个”空”的Wav对象,它的采样率是16KHz并且使用16bit的量化(sampwidth=2)。
并且检查wav文件的数据类型是int16,采样率是输入参数pr指定的值,否则抛出异常。最后把wav.data转成numpy数据组,并且把值从int16转换成(-1,1)区间的浮点数。
vectorize
我们来看默认的vectorize这个Callable,它的输入是是float32的一维的ndarray(load_audio的输出),输出是特征(n_features=29,13)。
def vectorize(audio: np.ndarray) -> np.ndarray:
    if len(audio) > pr.max_samples:
        audio = audio[-pr.max_samples:]
    features = vectorize_raw(audio)
    if len(features) < pr.n_features:
        features = np.concatenate([
            np.zeros((pr.n_features - len(features), features.shape[1])),
            features
        ])
    if len(features) > pr.n_features:
        features = features[-pr.n_features:]

    return features
这里默认只保留最后max_samples=24000个样本点,如果是默认的16KHz的采样率,那么就最多保留最后1.5s。超过的部分就截取掉。
然后使用vectorize_raw函数提取特征(frame_num, 13),这里我们只保留29(n_features)帧的信息,如果超过就截取,不足就padding。
vectorize_raw最终会调用到sonopy.mfcc_spec来提取MFCC特征。sonopy也是mycroft_precise作者写的一个工具,这里就不详细介绍怎么提取MFCC特征了,感兴趣的读者可以参考MFCC特征提取或者sonopy。
进行预测
训练完成模型之后就可以测试效果了:
precise-listen hey-computer.net
启动后我们就可以对着麦克风说hey computer,如果识别出来它就会打一行log。
我们可以发现模型的效果很差,因为只有正例没有负例。
增加负例
有两种办法,一种我们手工录制;另外一种随机的找一些录音。我们这里使用第二种方法,可以从Public Domain Sounds Backup免费下载。
cd data/random
wget http://downloads.tuxfamily.org/pdsounds/pdsounds_march2009.7z

7z x pdsounds_march2009.7z
cd ../..
解压后的文件都在data/random/mp3下,但是下载的格式还需要转换成我们需要的格式:16KHz采样率的16位量化的单通道的wav文件,这可以通过下面的脚本调用ffmpeg(因此需要安装它)来完成转换:
SOURCE_DIR=data/random/mp3
DEST_DIR=data/random

for i in $SOURCE_DIR/*.mp3; do echo "Converting $i..."; fn=${i##*/}; ffmpeg -i "$i" -acodec pcm_s16le -ar 16000 -ac 1 -f wav "$DEST_DIR/${fn%.*}.wav"; done
最后在data/random里会有很多负例:
~/codes/mycroft-precise$ ls data/random/|head
006No Title-.wav
069No Title-.wav
072No Title-.wav
073No Title-.wav
074No Title-.wav
075No Title-.wav
076No Title-.wav
077No Title-.wav
079No Title-.wav
08-01-01-Silvester in Berlin-fireworks-1.wav
接下来我们采用增量的训练:
precise-train-incremental hey-computer.net hey-computer/
训练完成后可以进行测试:
precise-test hey-computer.net hey-computer/
也可以实时的来进行热词检测:
precise-listen hey-computer.net
有了负例之后效果明显变好。如果发现有badcase,那么可以把badcase放到训练数据里,然后不断的迭代,直到达到满意的结果为止。
precise-listen和precise-train-incremental也比较简单,这里就不一一分析了,有兴趣的读者可以自行阅读源代码。
- 显示Disqus评论(需要科学上网)